

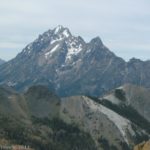
Mt. Stewart, as seen from Bean Peak
The Teanaway region of Washington State has some fantastic trails. I don’t mean that the trails are crazy (although that may be true, as well); the views from the trails are absolutely stunning. Not the least of these trails leads up to Bean Peak, where breathtaking views await those who make the scramble to the top of the peak. There, you can see Mt. Stewart up close and personal, as well as Stewart Pass, Ingalls Mountain, Judy Peak, Mt. Rainier, and Earl Peak, to name a few of the landmarks you can see. And, across the valley from you are snow-flecked, classic Cascade-type peaks. It doesn’t get much better than this!
To get to the parking area for this trail, from I-90 take exit 85 (South Cle Elum) and head east (north) on Hwy 970. Alternatively, from Hwy 97, turn right onto Hwy 970. Either way, you will want to turn north (that’s left if you’re coming from I-90; right if you’re coming from Hwy 97) onto Teanaway Road. Drive approximately 10 miles to the 29 Pines Campground, at which point the road will become gravel. I didn’t see any sign that said “29 Pines Campground”, but there is a campground at this point. Here the road changes names to Forest Road 9737. Continue on this road for just over 3.5 miles to a small dirt road on your right (Forest Road 112). This road is located just before the bridge over Beverly Creek. If you come to the Beverly Creek National Forest Service Campground, you’ve gone too far. Turn right onto Forest Road 112. It is one-way and quite bumpy and isn’t very well maintained, but there were several passenger cars at the trailhead at the end of the road (one was a PT Cruiser). However, I would recommend high clearance. The parking lot itself is quite rocky, so trying to back into or out of a parking space can be interesting.

One of your first views of Bean Peak
The trail begins on the right side of the parking lot next to the signboard. If you are planning on entering the Alpine Peaks Wilderness (I’m not exactly sure where the line is in this area), you will need to fill out the permit form available at the signboard. We didn’t know whether we would be entering the wilderness or not, so we filled out a permit form and deposited our stub in the collection box. You can also buy your Northwest Forest Day Pass here. You will need to either pay your $5 a day and display your pay stub in the windshield of your vehicle, or display your valid Interagency/Senior/Access Pass or Northwest Forest Annual Pass in your windshield. It wouldn’t surprise me if they check this area. Instructions are located on the signboard.
Head out across the bridge that crosses Beverly Creek. The trail beyond is quite wide and easy to follow, although bushes have grown up on either side, so you may have to brush these aside in places. My guess is that this was the road to the original parking area (located 0.5 miles or so up the trail). A sign just after the old parking area confirms that you are on the right trail (Beverly Creek Trail #1391). Not long after this you will come to a trail junction. The Beverly Creek Trail #1391 goes left, while the Bean Creek Trail #1391.1 goes right. This is at the confluence of Beverly and Bean Creeks, although you probably can’t see the confluence from the trail split. Turn right up the Bean Creek Trail.

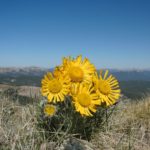
Wildflowers along the trail
The trail for the next 0.25 mile or so is quite bushy, with plants overhanging the trail and brushing against your legs. However, persevere: after you cross Bean Creek, the trail isn’t as grown-in. Even in this area, though, the trail is easy to follow. The stream crossing itself should be fairly easy (assuming the water isn’t too high). There are many stepping stones, as well as branches put down by helpful hikers. From the very beginning of the trail you have been gently climbing, but just after the stream crossing you will come to your first big assent. However, after the hill, the trail levels out again. You are definitely climbing still, but no more so than Bean Creek is falling below you.
For a while, you will walk through a pine forest, then come out into a kind of meadow/forest. Here you will see a trail split without a signpost. One trail will stay on your side of the stream, while the other will cross the stream. For now, stay on your side of the stream. This trail will take you up towards Bean Peak. If you had crossed the stream, you would be on the trail to Earl Peak, which I’ll talk about in another post. This is also a very nice destination. Many people climb up Earl and then walk along the ridge over to Bean. I personally recommend that you climb up Bean and then cross the ridge to Earl if you have a hankering to do both peaks. Either way, you can take this second trail back if you decide to do the loop. The trail up Bean Peak and back is about 5 miles RT, while the entire loop is around 7 miles.

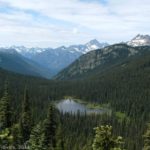
Mt. Stewart from the ridge
For now, don’t cross the stream, and head upward into the meadows. Here we found an abundance of wildflowers in mid-August (although I heard that they had a very late summer this year, so the wildflowers were a bit late). Earlier in the season, the woods, meadows, and along the stream would have been filled with wildflowers of every variety. Even when I hiked it, the purples, whites, reds, and yellows were glorious. Unfortunately, in the meadow the trail becomes harder to follow. Keep walking towards the far end of the valley and the large craggy peak high above you at the end of the valley. This is Bean Peak. A vague trail eventually begins to ascend the scree at the end of the valley. This is probably the hardest part of the hike, but don’t give up yet. Even if you can’t make it up to the top of Bean Peak, the views from the ridge are outstanding, and well worth the effort to get up there.
From the parking area to the top of Bean Peak, you will gain 3,000 feet of elevation (in 2.5 miles, no less!). Although you have been steadily gaining elevation, I believe that you gain most of those 3,000 feet in the last mile up the scree. You are scrambling up an almost non-existent trail on a very steep scree-covered slope. I’m not trying to deter you here; just realize that this is not for a casual hiker who likes walking along boardwalks. My entire group made it, even one who isn’t very fond of heights and doesn’t consider herself good at scrambling. Take time to turn around and look back down at the valley and meadows you are leaving far below you: it is really pretty! Also, as you climb, you will begin to get glimpses of Mt. Rainier over the ridge that is on your left when you are facing Bean Peak. The last mountain on this ridge is Judy Peak, which can also be climbed, although I didn’t do it on this trip.

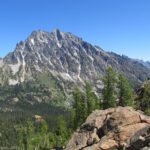
Bean Peak as seen from the ridge
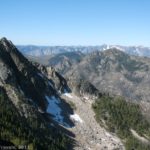
Once you get up to the ridge, head over to your right for a moment to take a look down into the valley. It’s gorgeous! Mt. Stewart, over on your left, is somewhat hidden behind a ridge, but you can gape across the valley at the classic-Cascade-type peaks, which unfortunately I don’t know the names of. They were beautiful when I was there, flecked with snow and looking like solid crags of granite. Totally beautiful!
When you can tear yourself away, head back over to your left along the ridge towards Bean Peak (elevation 6,743 ft.). There is no real “trail” up the peak; just a scramble over boulders, rocks, and scree. We headed over to the left side of the peak to climb up, but there really is no “best” way. What you do will depend on your abilities and how much bouldering you have done in the past.

Mt Rainier in the distance, with Judy Peak on the left
Unfortunately, the top of the peak was swarming with a mixture of flying ants, termites, flies, mosquitos, and little no-see-ums that bit if you weren’t careful. We skirted the top, and ate lunch on the far side, enjoying the view. The view! Oh, my! What can I say? It’s breathtaking! Over on the right are the Cascade-type mountains you saw before, then, continuing counter-clockwise, comes the huge bulk of Mt. Stewart. Next to Mt. Stewart is Stewart Pass, then Mt. Ingalls. Because we had been hiking over in that general area the day before, we could pick out where Ingalls Lake was, as well as Longs Pass. More on your left is Mt. Rainier and Judy Peak, while in front of you are an array of Cascade Peaks. If you turn around, you can see the bulk of Earl Peak. I could stare at the view for hours!
The thing I liked about Bean Peak over Earl Peak is that you are closer to the mountains, so it is a more personal view. You feel like you are close to the mountains, as opposed to just seeing a wonderful array of a whole range of mountains, like you see from Earl Peak. It’s a personal preference, but in some ways I enjoyed Bean Peak more than Earl.

Ingalls Pass and mountains from the top of Bean Peak
Return by the way you came, or walk along the ridge over to Earl Peak. I’ll talk about the ridge walk in another post. One of the nice things about this area is that although it is known, it is not heavily visited. I was there on a Sunday, and I ran into less than a dozen people, spread out over the whole valley. Compared with the Ingalls Lake area, this was empty!
Round Trip Trail Length: 5 miles
Fees: $5 Northwest Forest Pass required (daily fee). Interagency, Senior, Access, and Northwest Forest Annual Passes also accepted.
Trail 
Road
Signs
Scenery
Would I go 100 miles out of my way for this?
Overall Rating:
This Week’s Featured Product!
With a focus on hikes to great views, this book is a great resource for hiking around Bean Peak and in Washington State.

Pingback: Anne's Travels » Earl Peak: The Cascades Laid Out Below You
Pingback: Anne's Travels » The Best View of Mt. Stewart
Pingback: 9 Reasons I Wear Hiking Boots instead of Sneakers