
Using the longer, foldable van bunkbed
Since we bought our first full-size van back in 2001, we have slept in the van rather than in our big blue tent (which never really fit on tent platforms anyway – more about sleeping in the van here). As our group has grown over the years, we’ve had to modify how we all sleep in the van to make everyone fit. Eventually we made the Roof Top Hotel out of an old truck cap on roof racks, but along the way we also developed a system of making a kind of bunkbed that lies flat over the backs of the seats in the rear of the van (others sleep on the seats). It’s pretty convenient, especially since it means we can sit on the seats during the day, and the bunkbed is easily set up at night. And it holds one adult or a couple children just fine. Pretty cool, right?
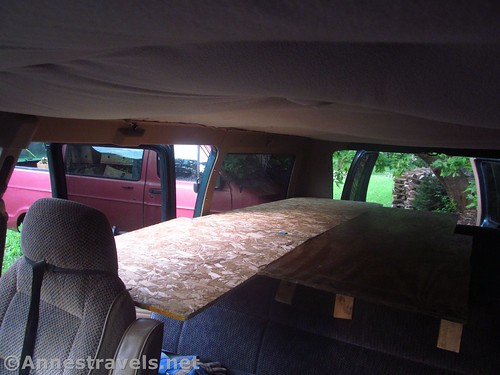
View of the van bunkbeds through the back door
We made the bunkbed mostly out of scrap materials – things we had picked up along the way or had left over from other projects. So we didn’t spend much on making the bunkbeds (buying it all new, you’re talking in the range of $40-$60). The materials are also pretty flexible, depending on what you have around. Just make sure they’re sturdy enough to hold up the person who will be sleeping on the bunkbed, lol.
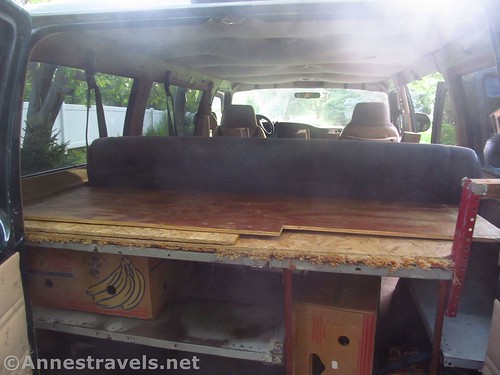
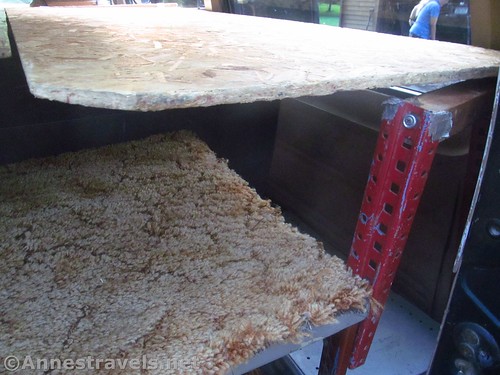
The van bunkbeds, folded and tucked away atop the shelving unit (Note: usually we don’t use banana boxes on the shelf; they just happened to be there)
We made two different bunkbeds – the first is foldable and stabilized by the headrest of one of the front seats.
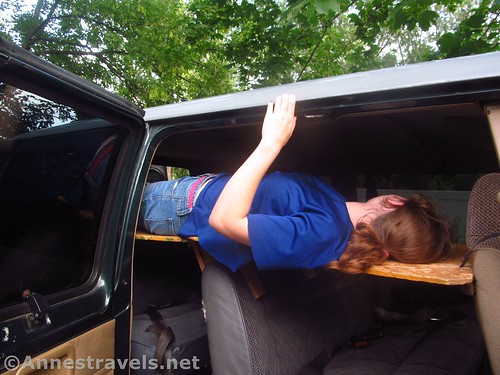
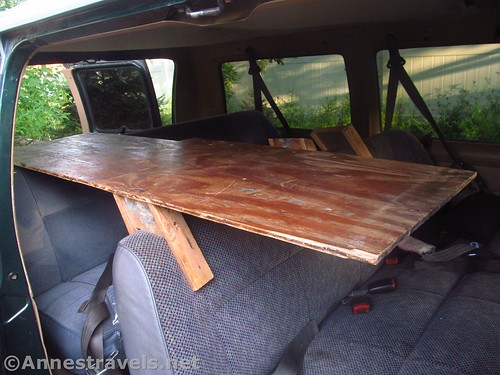
Using the longer, more stable, foldable Bunkbed #1
It’s quite stable, and you might even get two people on it (heads at opposite ends) if they don’t mind being squished and you can find a way to stabilize the opposite end – we attached an extra bar to the shelving unit we put in the back of the van to hold boxes and sleeping bags.
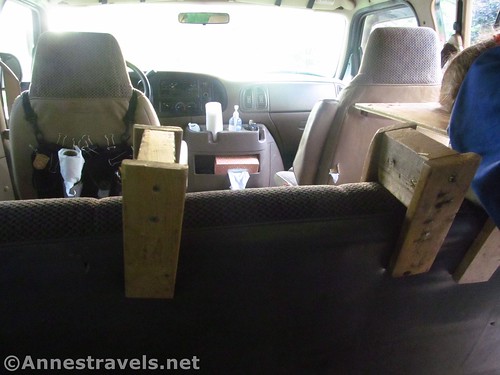
The stabilizing structure off the shelving unit to hold up the back end of the van bunkbed – you don’t need this unless you plan on having two people sleeping with their heads on opposite ends of the bunkbed
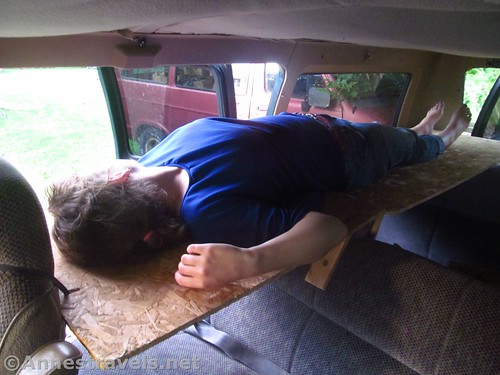
The second is smaller and simpler to make (much simpler!) but it isn’t as steady because it only rests on the backs of the seats in the rear of the van:
The smaller, less steady (but easier to make) van bunkbed
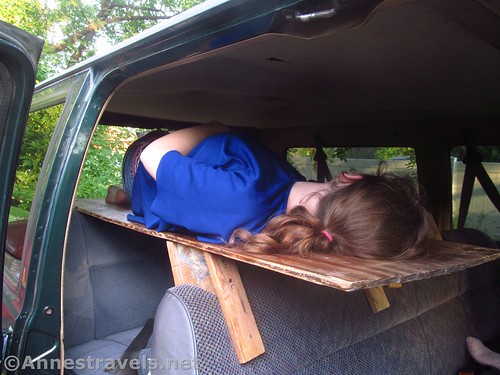
In fact, you’d better be careful not to get this one off-balance, or you might end up like this:
It’s a good thing she has lots of practice not falling off that van bunkbed…
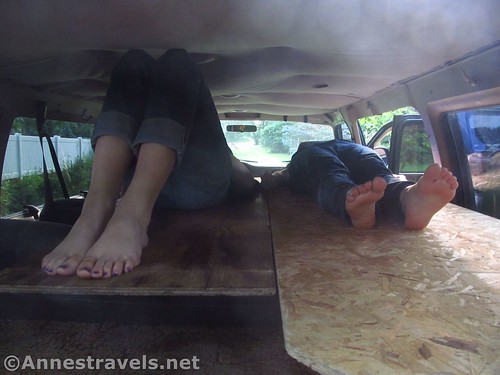
Having the two bunkbeds side-by-side helps to stabilize the smaller bunkbed, but I’d still be careful of your center of gravity 🙂
Both of the van bunkbeds
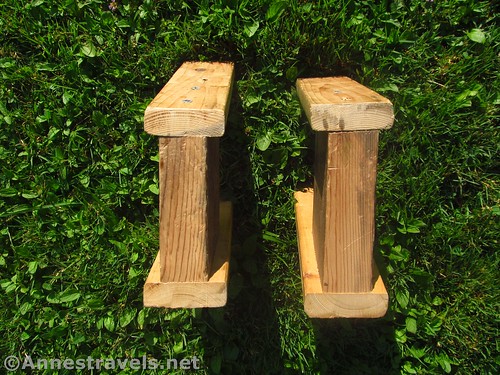
You’ll also need to make 2 crutches (for each bunkbed) if the backs of the rear seats are not at the same height:

Crutches to make the bunkbed flat if the back bench seats aren’t the same height
What You’ll Need to make a Removable Bunkbed for your Van
For all Bunkbeds:
Cardboard, foam core, or junk wood (optional – I highly recommend you make templates out of cardboard, foam core, or junk wood so you know everything fits before you start making things out of real wood – which is how we ended up with one made out of pressboard; it was supposed to be the prototype, but ended up working so well we still use it!)
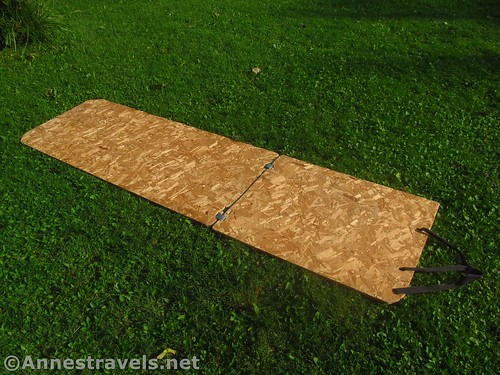
The longer, foldable Bunkbed #1
For Bunkbed #1:
1 piece of plywood or pressboard cut to 55”x24” (140cmx61cm)
1 piece of plywood or pressboard cut to 30.5”x24” (77cmx61cm) (see notes below)
56” (143cm) of 1″ (2.5cm) webbing – I think the blue webbing came off of a pallet we picked up at the local flower shop; the black webbing was upcycled off of something-or-other and had the ladder slider buckle attached to it.
1 ladder slider buckle – make sure it will hold the webbing securely enough to not slip through the night, though as long as it holds the webbing in place, it’s probably not going to cause too much damage.
Staple gun & staples
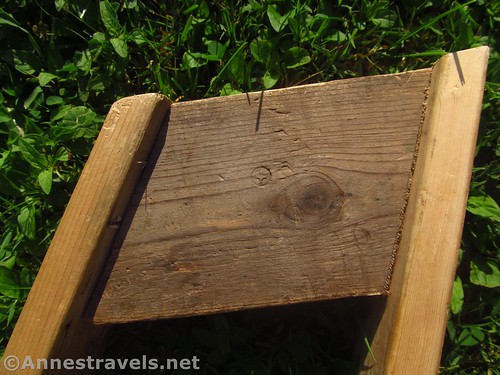
The shorter van bunkbed #2. Note the jag out of one side – this happened to be there, but it’s not necessary. It does make it easier to get in and out, though.
For Bunkbed #2:
1 piece of plywood or similar, cut to 63”x21” (160cmx53cm)
(Note: if you’re making this as a stand-alone bunkbed, I highly recommend making it a bit wider, as that will increase its stability).
A top view of the cruches for making the van bunkbed flat if the two seats aren’t the same height
For the Crutches:
2×4 board – cut 2 pieces to about 5.75” (14.6cm) each
1×3 board (furring strip) – cut 4 pieces to 8.75” (22.2cm) each
8 wood screws
Tools:
Power saw to cut the wood to the right size
Drill and 0.25” (0.6cm) bit to cut holes for webbing (Bunkbed #1)
Saber saw / file (if using pressboard) / other small saw to cut holes for webbing (Bunkbed #1)
Scissors or a knife for cutting webbing (for Bunkbed #1)
Staple gun (for Bunkbed #1)
Sewing machine or hand sewing needle & thread (for Bunkbed #1)
Protractor (optional) (for Crutches)

Van Bunkbed #1, folded up for storage
Before we begin, I should probably say that we have used the crutches & Bunkbed #1 in both of our Dodge Ram 1500 vans – we did have to make slight modifications to it (shorten it) when we went from the older model (1997) to the newer model (1999). It was also designed to fold and then fit on the shelving unit in the back of the van under the sleeping bags, which lie flat across the top of the unit. Bunkbed #2 happened to be the size that it was (it even had some kind of hole cut in the side), but it worked out well since it is short enough to lie flat on the shelving unit. Also note that we added longer bench seats (4 seaters instead of 3 seaters) so everyone in the group fits, lol, and we still have space for all our stuff in the back (unlike the Ram 2500s, which has a seat right up against the back door). That’s important because you may have to use this on the driver’s seat (we attach it to the passenger seat) if your seats don’t extend far enough for the crutches to work / the bunkbed to rest on the backs of the rear seats.
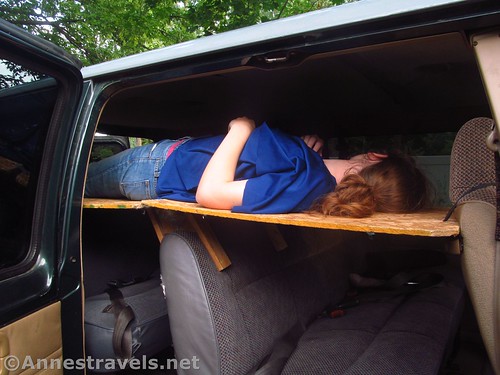
Using Van Bunkbed #1
Making Bunkbed #1:
Cutting Notes: The size of the 30.5”x24” (77cmx61cm) piece is very important – measure the length of your van from the back of the front passenger or driver’s seat to the back of the first rear seat. This is the measurement of the length of this piece of wood – length” x24” (61cm).
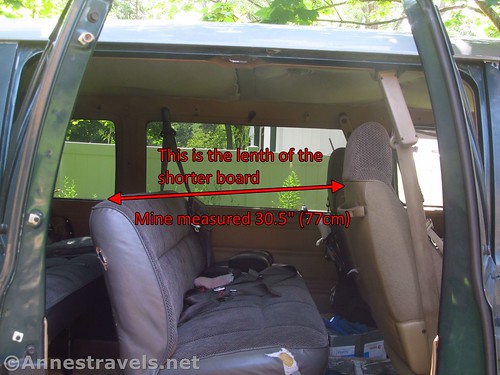
How to measure for the length of the shorter board
The size of the 55” (140cm) board is less picky, so you can always modify the length to make it fit in your situation. You may also want to round off the edges to make the bunkbed fit better into the van / make it easier to get in and out.
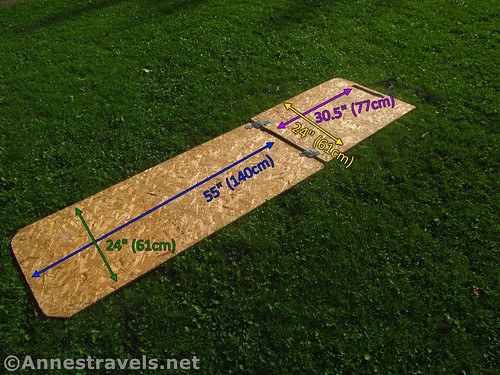
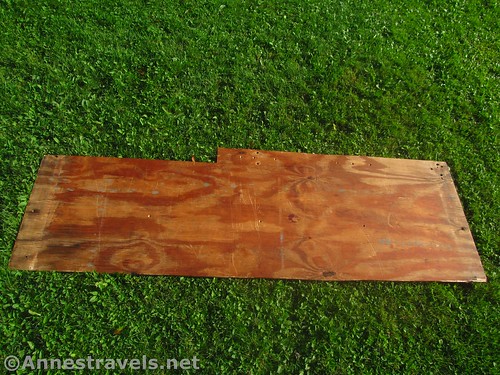
Measurements of the two pieces of wood for Van Bunkbed #1 (Note that this is the bottom of the bunkbed)
Cut the wood to size, checking it out in the van to make sure it’s all fitting correctly (a few extra hands are helpful here).
Using the 55” (140cm) board, use a drill and 0.25” (0.6cm) bit to drill a hole about 4” (10cm) from the long side and 0.5” (1.2cm) from the short side. Drill a second hole about 1.25” (3.1cm) from the first hole, still about 0.5” (1.2cm) from the short side. (See the diagram below.) Use a saber saw to cut between the holes to create one larger, 1.25”x0.25” (3.1cmx1.2cm) hole. (If you don’t have a saber saw, you might be able to file out the hole or use a small blade from, say, a coping saw – just make sure you cut a hole, not out to the edge of the board!) Cut a similar hole 4 inches from the other side (does this make any sense? – see the diagram below).
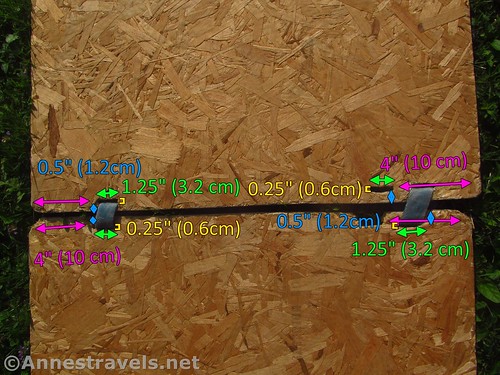
Measurements for hole placement
Repeat the two holes on one end of the 30.5” (77cm) board. Then make two more holes 8” (20cm) and 6.25” (15.8cm) from the long edges at the other end of the 30.5” (77cm) board (see the diagram below of all four holes).
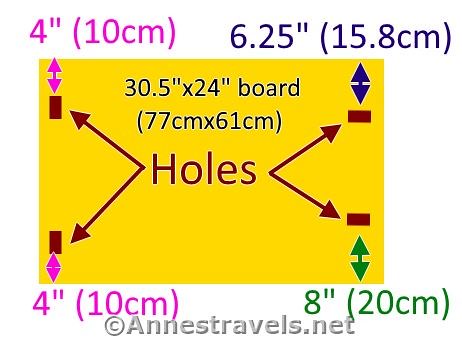
More hole placements
Note that the holes on the 55” (140cm) board and the first two holes on the 30.5” (77cm) board are horizontally parallel to the short ends of the boards, while the final two holes are cut vertically parallel to the long edges of the board (see the diagrams).
Cut the webbing into three pieces – 2 pieces that are 9” (23cm) long, and 1 piece that is 38” (97cm) long. (Note: if your holes are further than 0.5” (1.2cm) from the short edge of the board, you’ll need to make the two shorter pieces of webbing longer than 9” (23cm). In fact, if you have enough webbing, make the 2 pieces 10” (26cm), then either cut off the excess or staple it in such a way that the excess isn’t noticeable.
Place the two boards end-to-end, bottom sides up (if it matters to you), with the 1.25”x0.25” (3.1cmx1.2cm) holes corresponding and right next to each other.
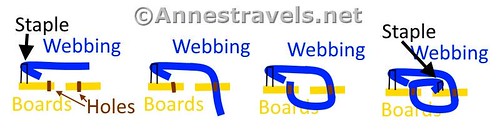
How to weave the webbing
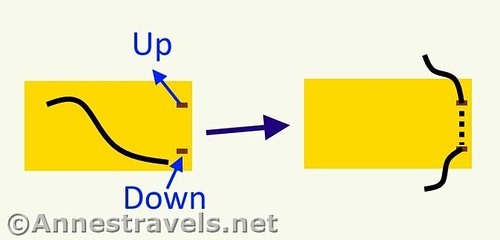
Take one of the 9” (23cm) pieces of webbing, turn under the end about 0.5” (1.2cm), and place, turned-over-side-down, on the bottom of the 55” (140cm) board, below and to the left (middle of the board) of one of the 1.25”x0.25” (3.1cmx1.2cm) holes. Staple firmly in place using a staple gun.
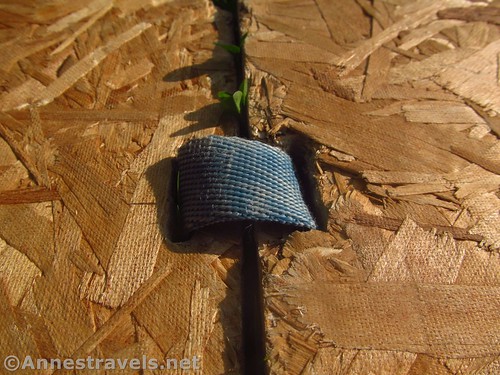
Bring the webbing down through the horizontal corresponding hole in the 30.5” (77cm) board, then back up through the corresponding horizontal hole in the 55” (140cm) board. Staple as before on the 30.5” (77cm) board, tucking under the end at least 0.5” (1.2cm) as before, just to the right (edge side) of the 1.25”x0.25” (3.1cmx1.2cm) hole. You’ll want to look at the pictures to see what I’m talking about. It’s important that the webbing hold the boards close to each other, but you can still fold the one board over on the other.

What the webbing looks like on the bottom of the bunkbed
Repeat with the second 9” (23cm) piece of webbing and the second set of holes. When it’s finished, each should look like this on top:
Top view of the webbing hinge
From the top side of the 30.5” (77cm) board, push the end of the 38” (97cm) piece of webbing through one of the vertical holes at the end of the 30.5” (77cm) board. Without twisting the webbing, bring the end up through the other vertical hole. Push one end of the webbing through the ladder slider buckle, then back down through, creating a loop around the ladder slider buckle (see below). Turn end under 0.5” (1.2cm), pull through enough webbing so 1” (2.5cm) (plus the 0.5” (1.2cm) turned under) is beyond the buckle; stitch firmly in place (see the diagram below).
How to attach the webbing for the headrest strap
Weave the other end through the ladder slider buckle. Turn end under 0.5” (1.5cm) and stich in place (this will prevent fraying).
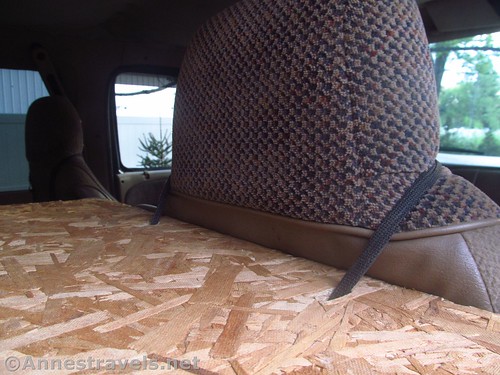
The bunkbed strapped to the front seat headrest
Take your new bunkbed out to the van, check it out for fit, and then move on to making the crutches (if necessary).
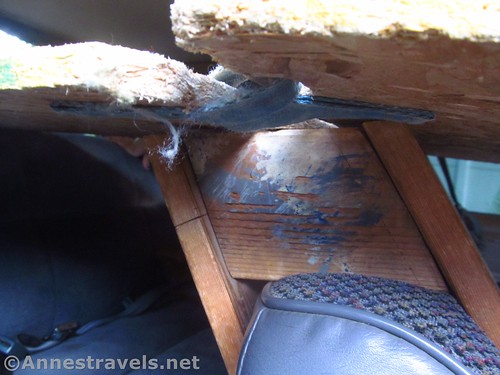
The crutch in use
Making Bunkbed #2
This is super simple – cut the plywood to size. Ta da. Move on to making the crutches if necessary.
Another view of the crutch in use
Making the Crutches
If the backs of the two rear seats are not the same height, you’ll need to make crutches to stabilize either bunkbed on the shorter seat.
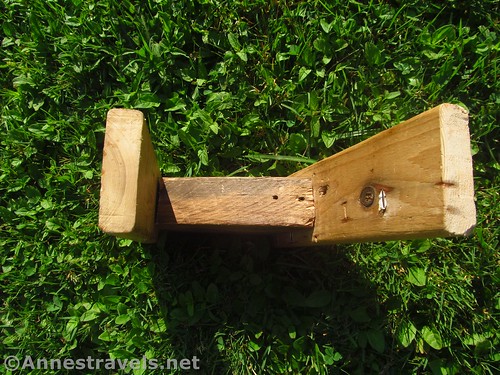
Bottom view of one of the crutches
The crutches are finicky things. I highly recommend making a mock-up of it first, with cardboard, foam core, or junk wood, just to make it work with your specific situation.
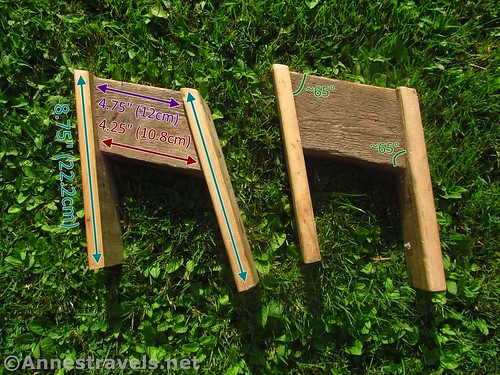
Measurements for the crutches
Take the pieces of 2×4 and cut them at about a 60 degree angle (mine seemed to be everything from 60 degrees to 73 degrees) on both cut edges. It will look something like the parallelogram you learned about in school (however long ago that was!)
Parallelogram shape of the 2×4
Attach the 1×3 pieces of wood, one on each side of the cut edges of the 2×4 pieces, using two wood screws in each side. Sand or cut the tops of the 1x3s so they are flush and smooth with the 2x4s (like in the pictures).
Screw placement – make sure they both go into the 2×4 🙂
Place on the back of the seat. They should fit snuggly (collapsing crutches is no fun!) If they are not snug, don’t fit, or are the wrong angle, take them off and try again.
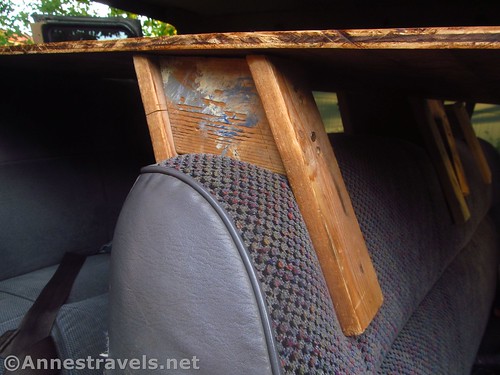
The crutches on the back of the seat
Final Steps
Put the crutches on the back of the seat (if using). From the rear doors of the van, push pallet into place (it helps to have a second set of hands to loop the 38” (97cm) loop of webbing over the headrest of the front seat for Bunkbed #1 – be sure to cinch the webbing through the ladder slider buckle so it fits snuggly around the headrest).
Bunkbed #2 in use
Check to see if everything lines up correctly. Make tweaks as necessary.
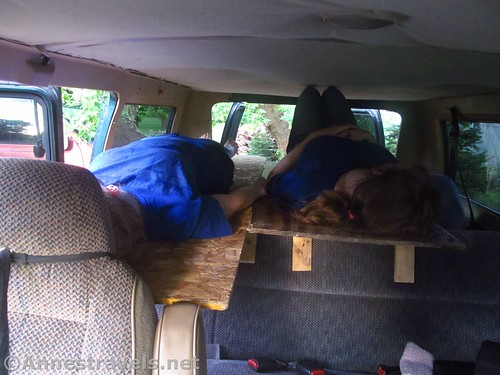
Both bunkbeds in use
We find a foam pad makes for a much more pleasant sleeping experience. Usually the sleepers put their heads toward the front of the van, but hey, whatever works…
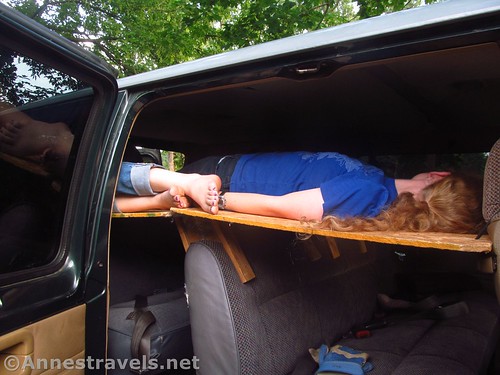
And this is what Van Bunkbed #1 looks like if two people sleep on it…
This Week’s Featured Product!