
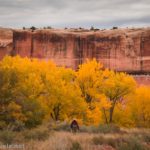
The far northern side of Arches National Park is definitely overlooked. It’s also extremely inaccessible. It can’t be accessed from the main part of the park except on foot, and by vehicle, I’d recommend high clearance to get to the parking areas from the roads that only take you to the edge of the park. But if you can overcome the access issues, you are treated to a wild area of canyons, rock formations, and arches rarely seen by anyone except serious rock climbers. But I’ll tell you how to see some of the best of it in Lost Spring Canyon as a day hiker.
Quick Stats
This post contains an affiliate link. If you click it and purchase something, I may receive a small commission at no extra cost to you.
Lost Spring Canyon is a gem. It’s hot on a warm day, the tread can be sandy, and there is one tricky turn, but it’s still so much fun to explore and find various narrow passages, arches, and more – and I truly enjoyed my hike there!
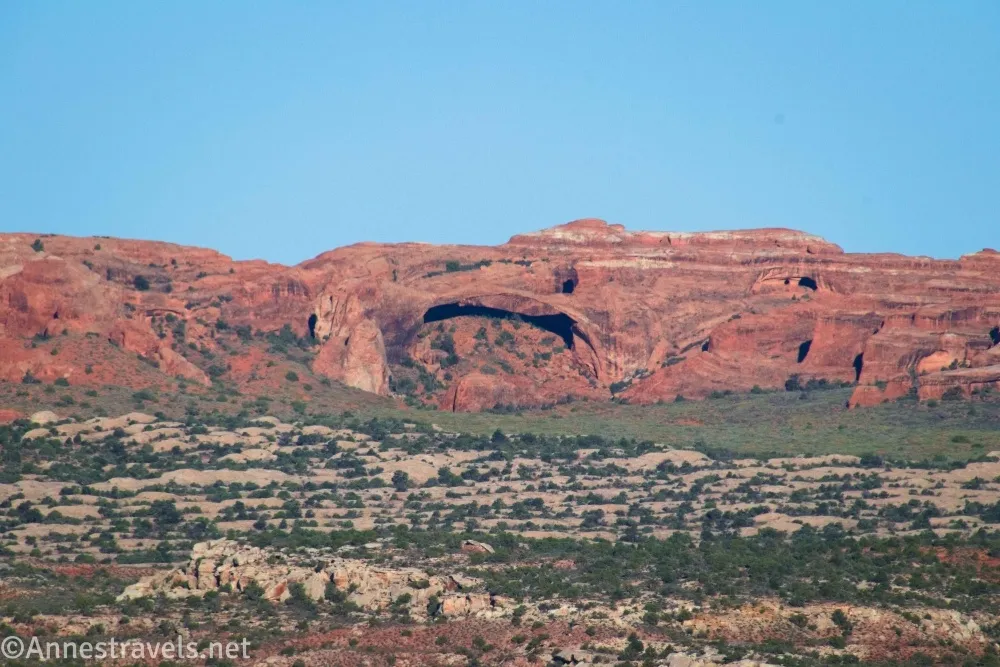
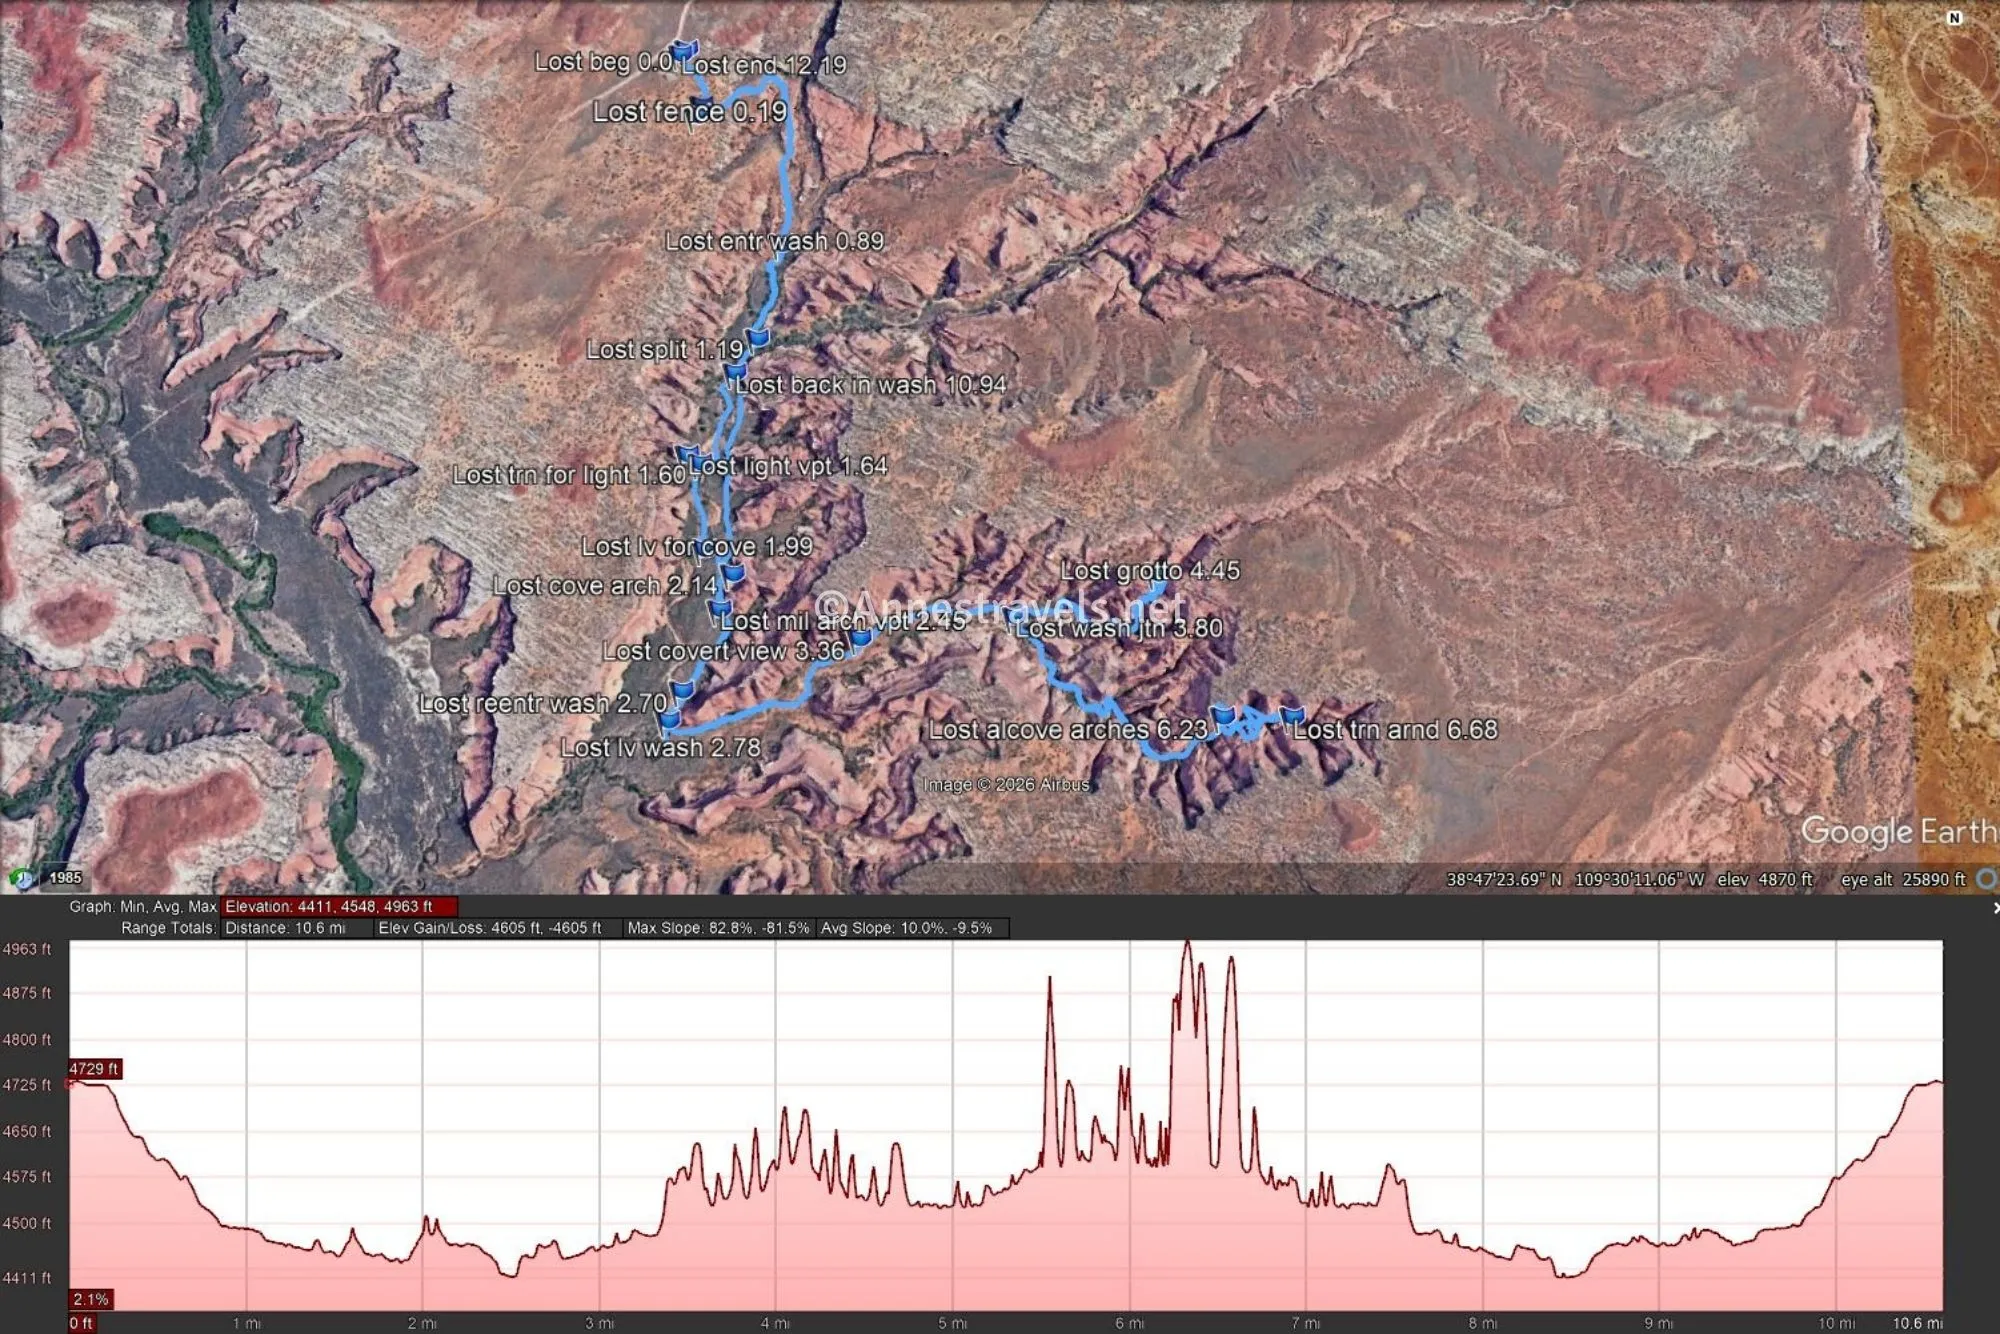
0.0 Lost Spring Canyon Trailhead (4,751ft.). This is obviously an old road traveling west across the slickrock (the main drivable dirt road continues south beyond the parking area, but it becomes sandy and ends at the route I used to climb down into Salt Wash to access Clover Canyon). If you know where you look, you may be able to see some of the main arches of Arches National Park – I spotted Landscape Arch, Partition Arch, Magic Mystery Bridge, Broken Arch, and Double O Arch (I think). A short distance down the old road heading east, it turns right and will eventually end at a barbed wire fence after about a quarter mile. However, you don’t want to go that far – instead, you want to turn left at a road junction onto a smaller road. (38.8036410°, -109.5172500°)
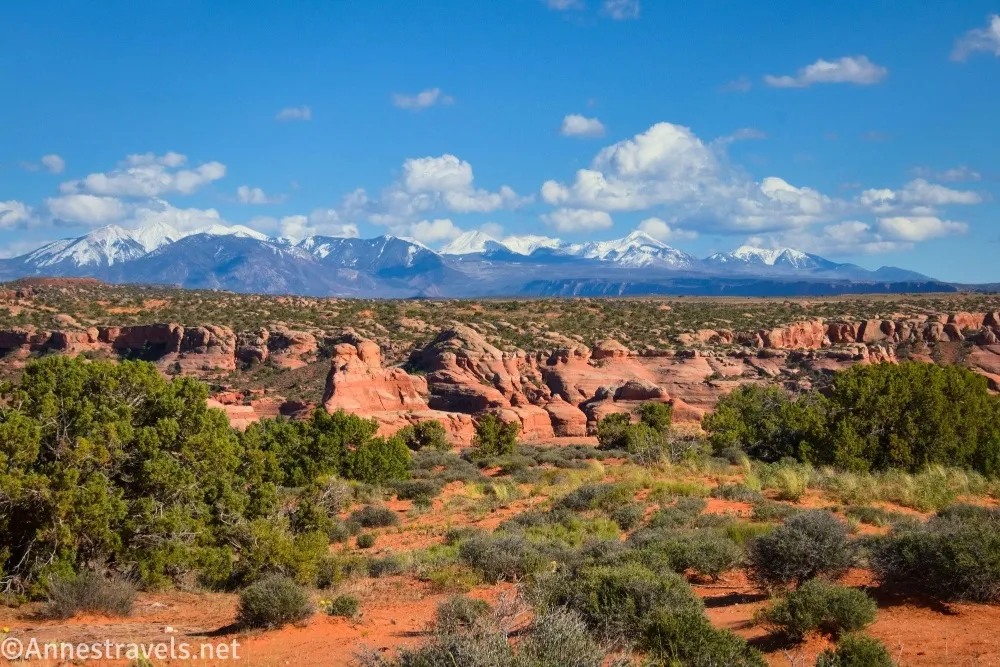
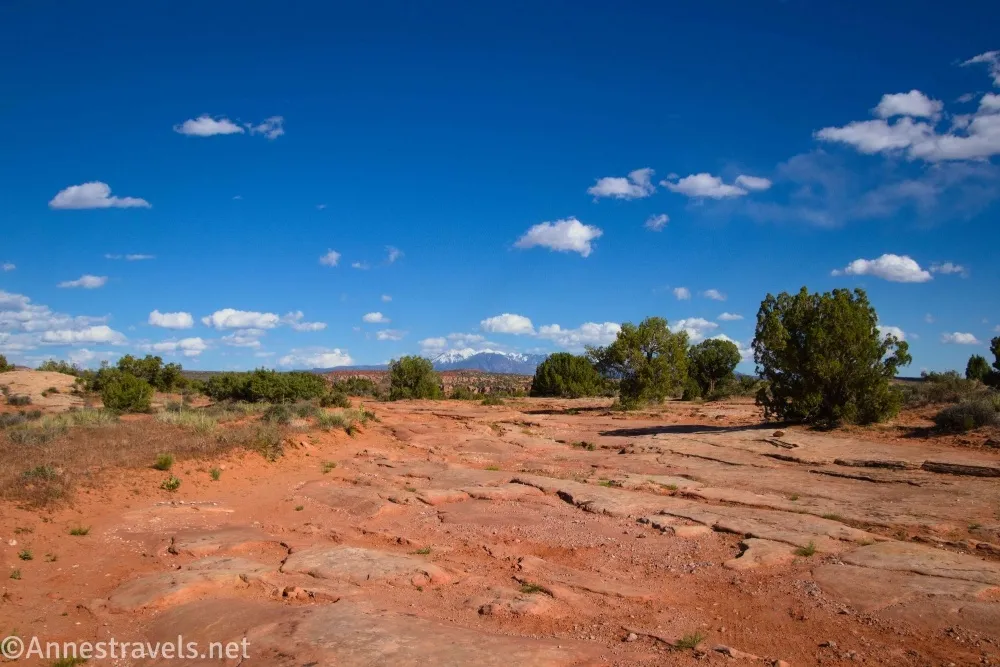
0.1 Road junction on left (east) (4,733ft.). This can be easy to miss if you’re not looking for it because the main road is so broad and obvious. The sideroad turns left and descends through the desert with great views toward the La Sal Mountains (views are best in the afternoon). It meanders down past an old corral and ranch area before dropping into the canyon (if you see another road junction about 38.801805198°, -109.51649013°, turn left). (38.8016480°, -109.5165090°)
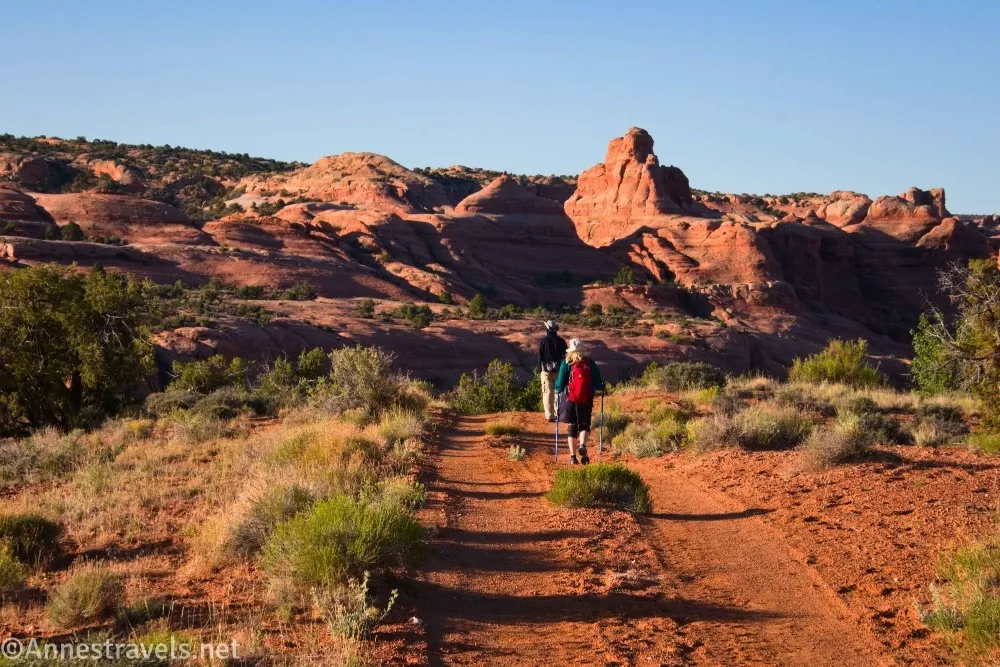
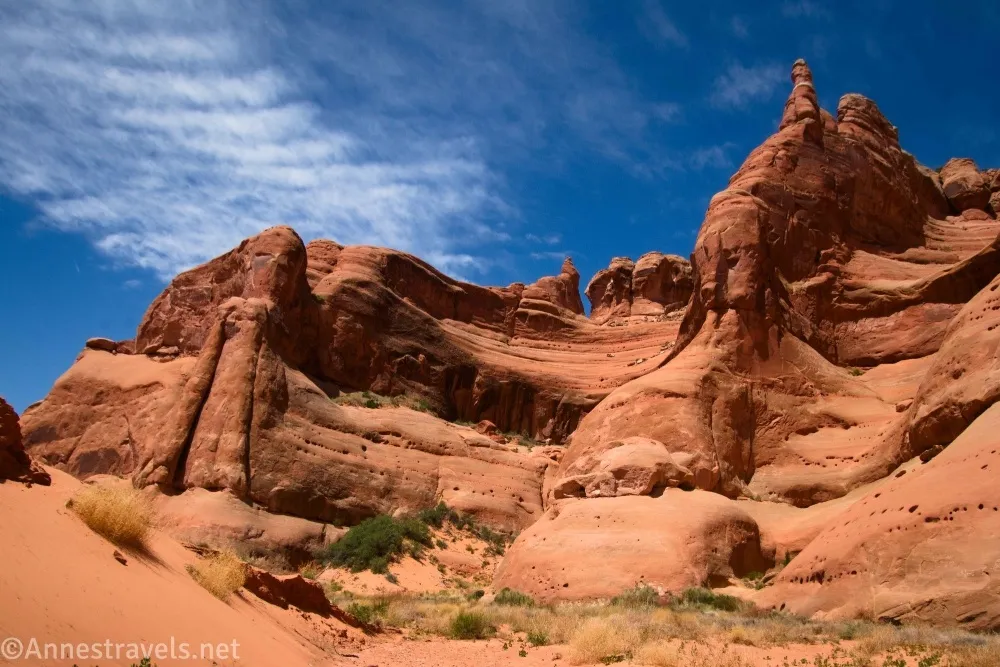
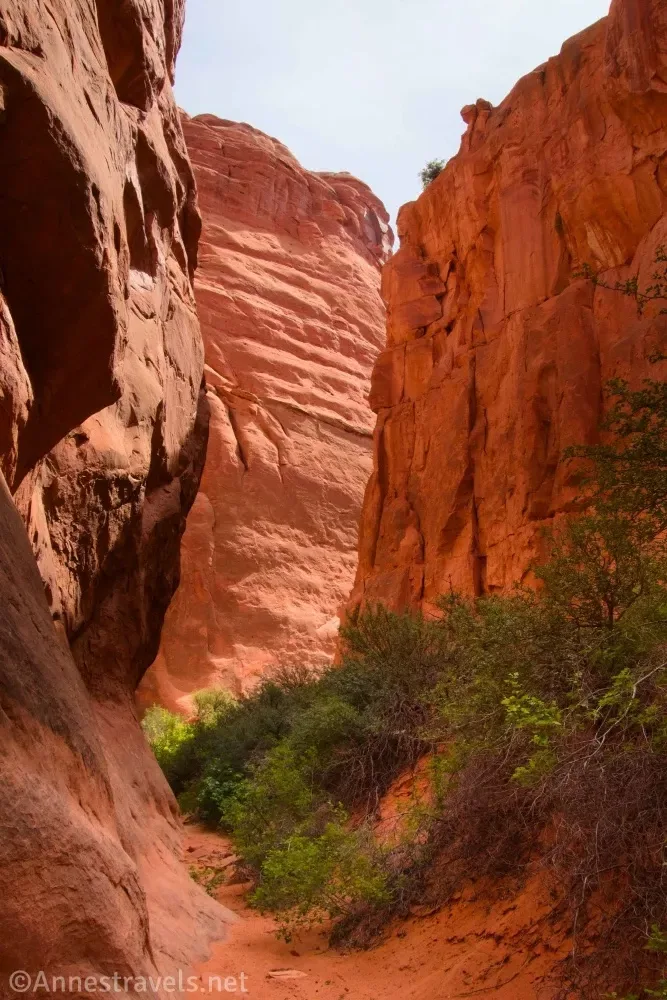
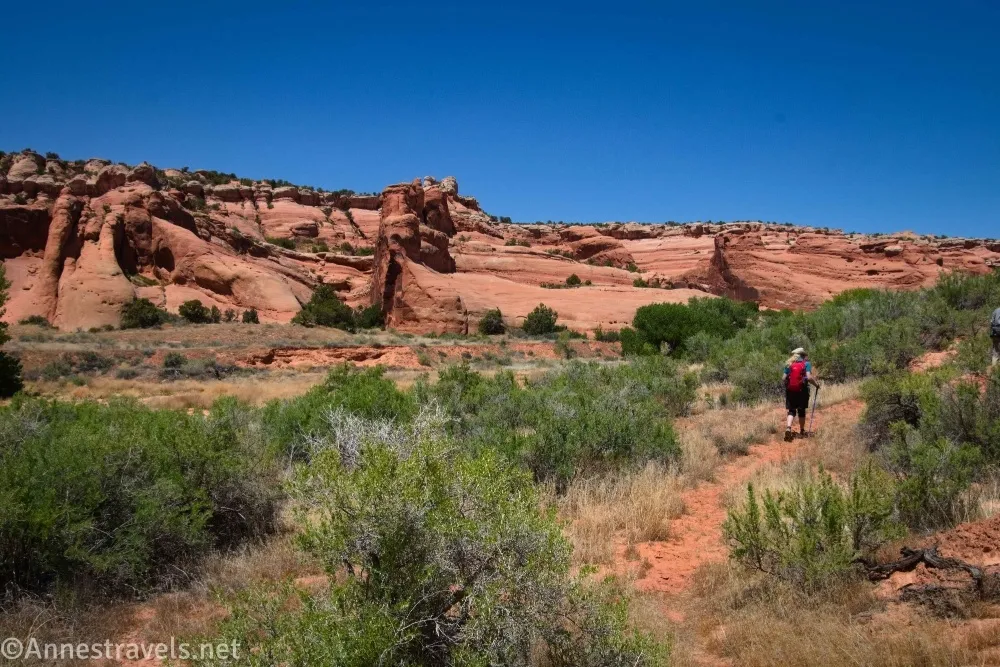
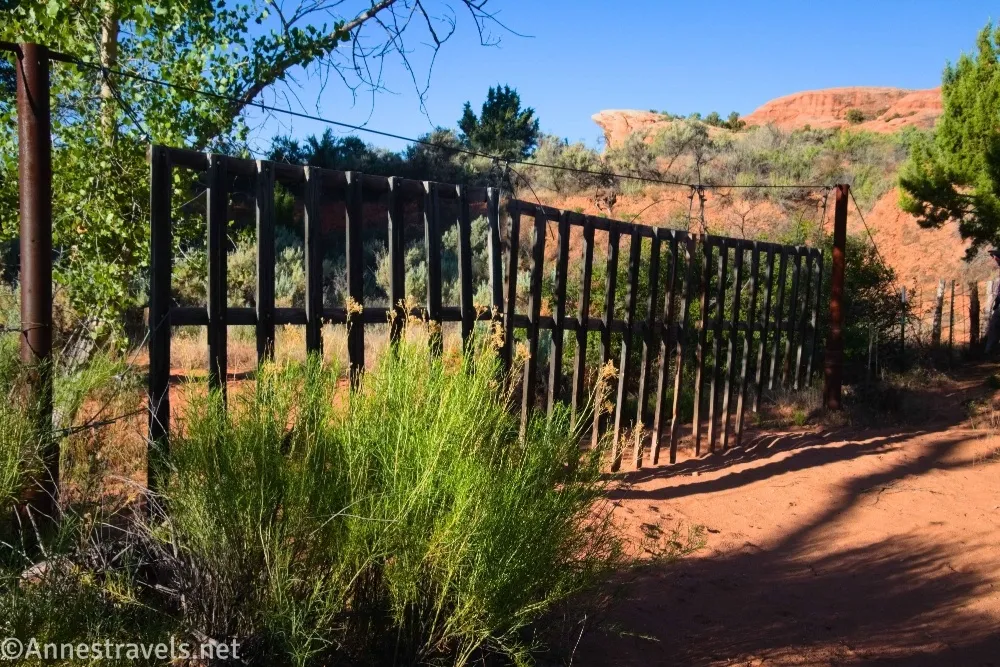
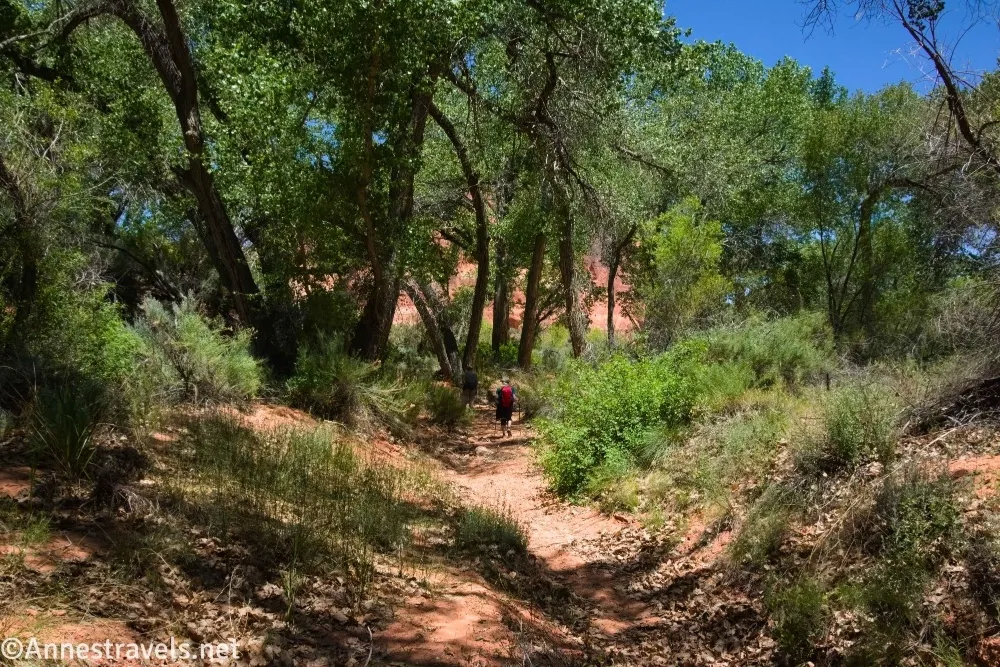
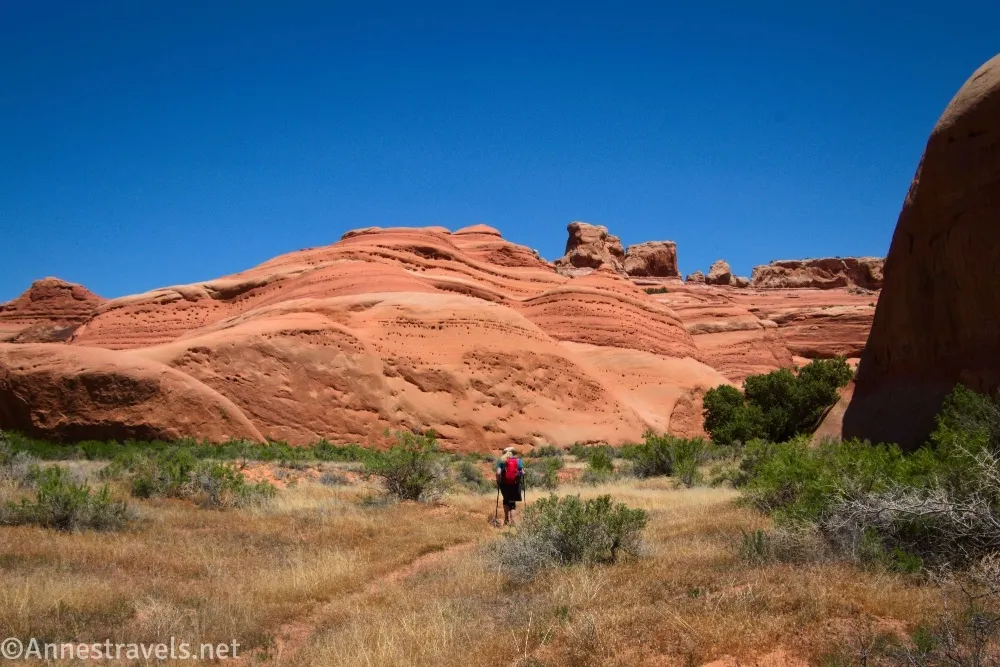
0.7 Drop into Lost Spring Canyon wash (4,497ft.). Turn right to walk downstream. This section of the hike is shaded by cottonwood trees and can be a little brushy – stay on social trails and you should be fine. Pass through the remains of an old cattle fence along the way (approx. 38.79670314°, -109.51306832° – I forgot to take a coordinate); when you come to a wash split about mile 1 (38.7936250°, -109.5139950°), take note of it so you can take the left fork on the way back up. The trees eventually end, allowing you to see the cliffs on either side of the canyon. If you’re in a hurry and don’t want to take the canyon bottom route (and you want to bypass Lightning Bolt Arch), you can turn left to the eastern side of the canyon about mile 1.3 (38.7924550°, -109.5149630°) to scramble to a grassy bench about halfway up the side of the canyon – a social trail traverses this bench and is much, much easier walking than taking the wash, even if you do have to occasionally descend into side washes and climb up the other side to keep going. However, I’ll take the wash in this guide – at least until after we’ve seen Lightning Bolt Arch. (38.7969170°, -109.5129990°)
1.4 Turn right for Lightning Bolt Arch (4,450ft.). Walk through some trees and then up a small wash on the west side of the canyon. The arch is small and is in a fin in the middle of the wash. (38.7893470°, -109.5163710°)
1.45 Lightning Bolt Arch (4,478ft.). It won’t take long to admire it (was it really worth the sidetrip?), then retrace your steps to the main wash and turn right (downstream). The next arch is better, believe me. (38.7896280°, -109.5169490°)

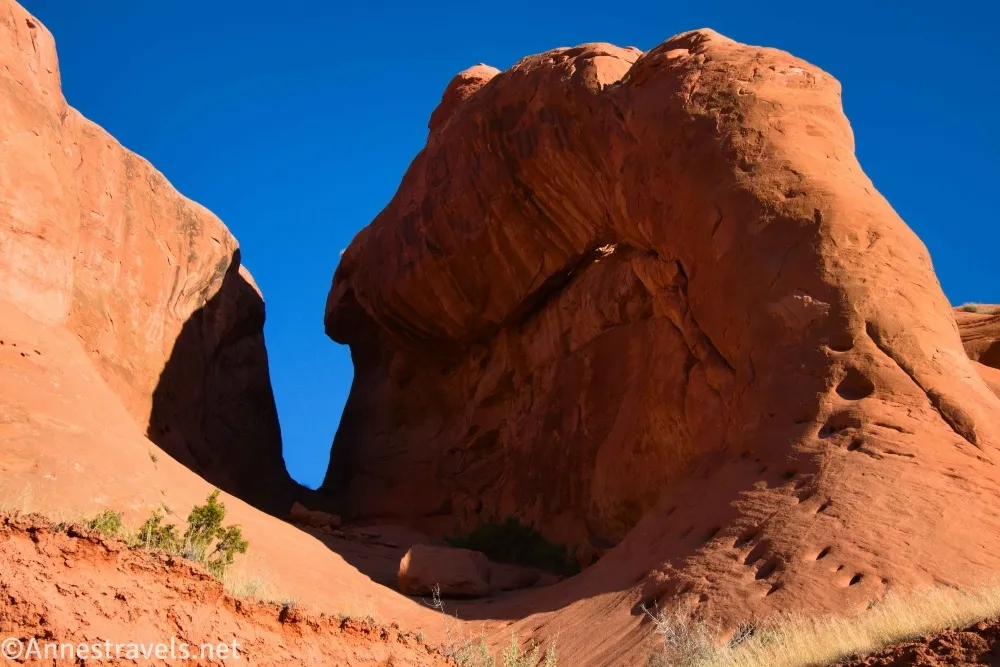
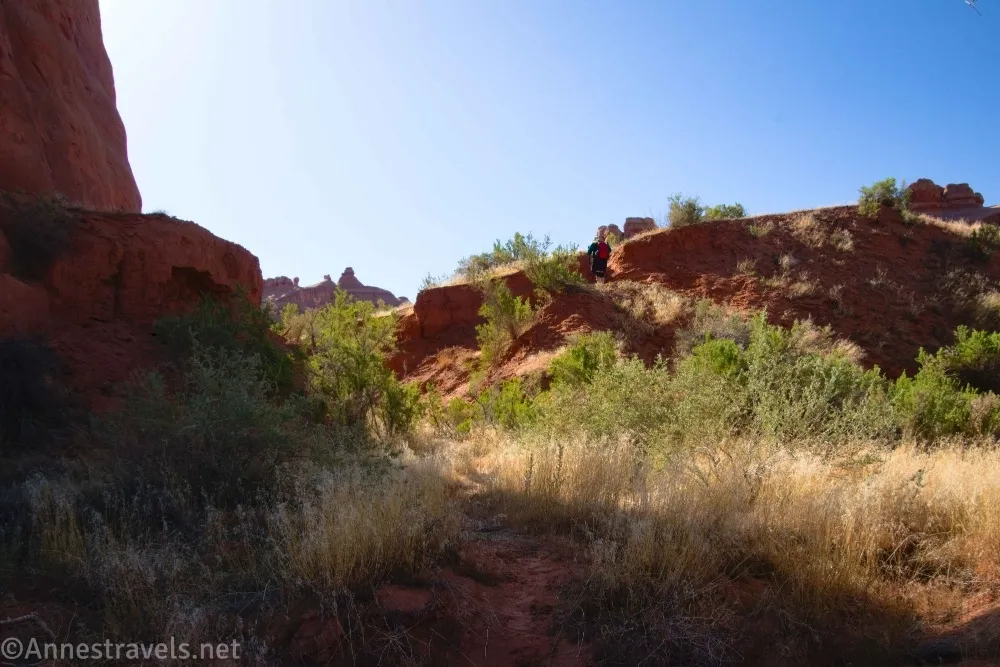
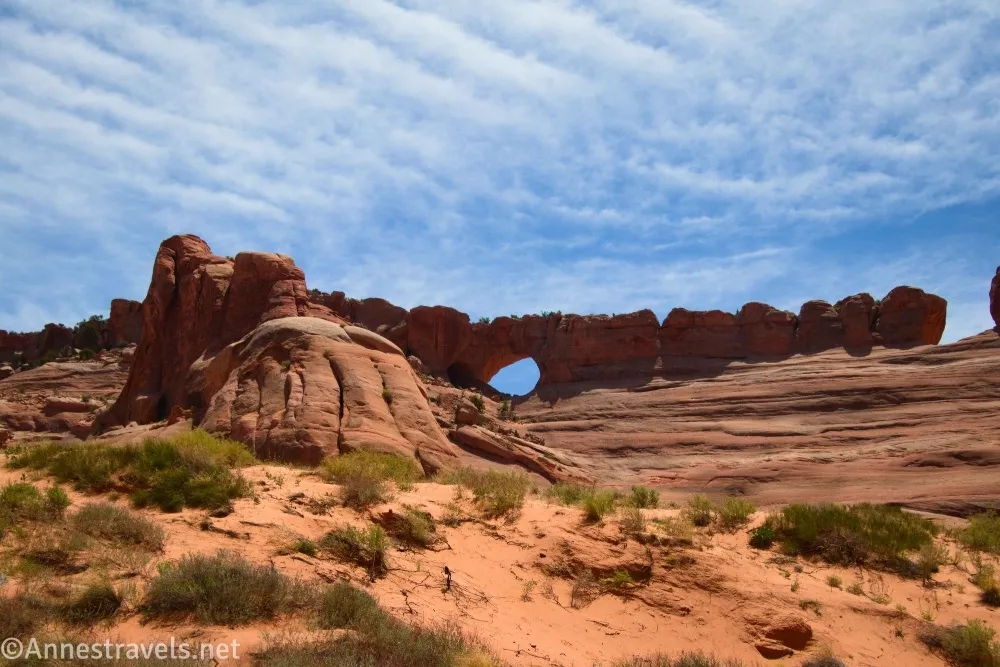
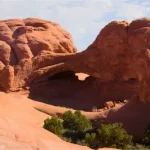
1.8 Turn left toward Cavern Arch (4,442ft.). Turn toward the eastern canyon wall, then walk a short distance up a side-wash, then scramble up the right side of the side wash to ascend to the grassy bench about halfway up the side of the canyon wall (if you ascended to this bench earlier, just keep going across the side wash). On the top of the bench is a well-defined social trail heading downcanyon. Take it until you see Cavern Arch in an alcove on your left – at least three social trails take you from the main social trail to the cavern. (38.7893470°, -109.5163710°)
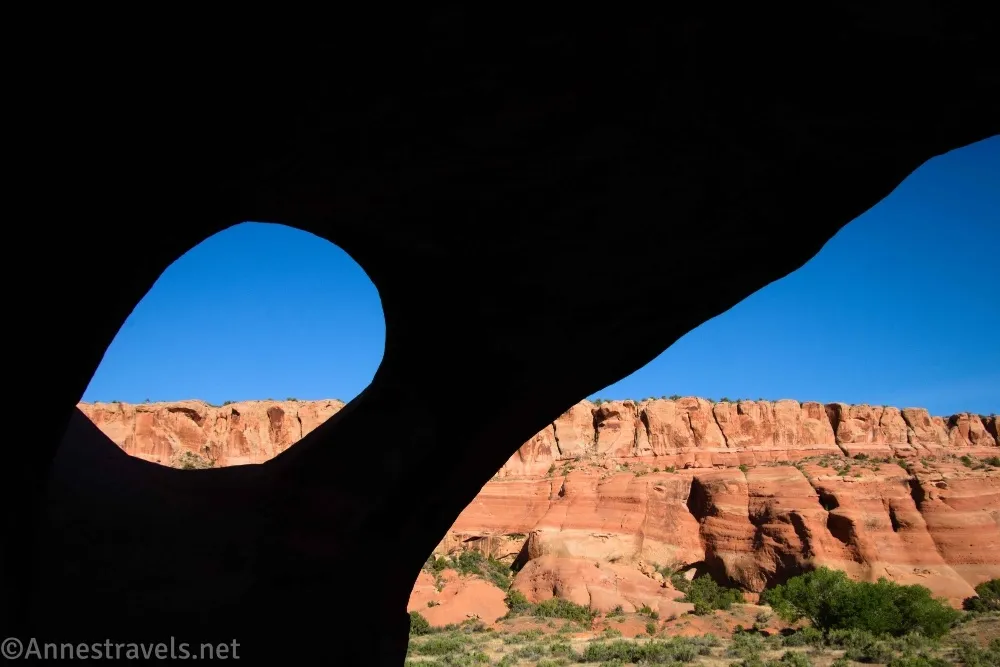
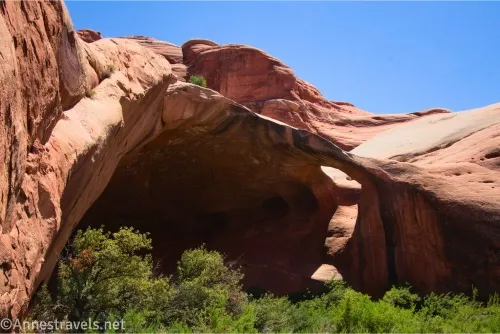
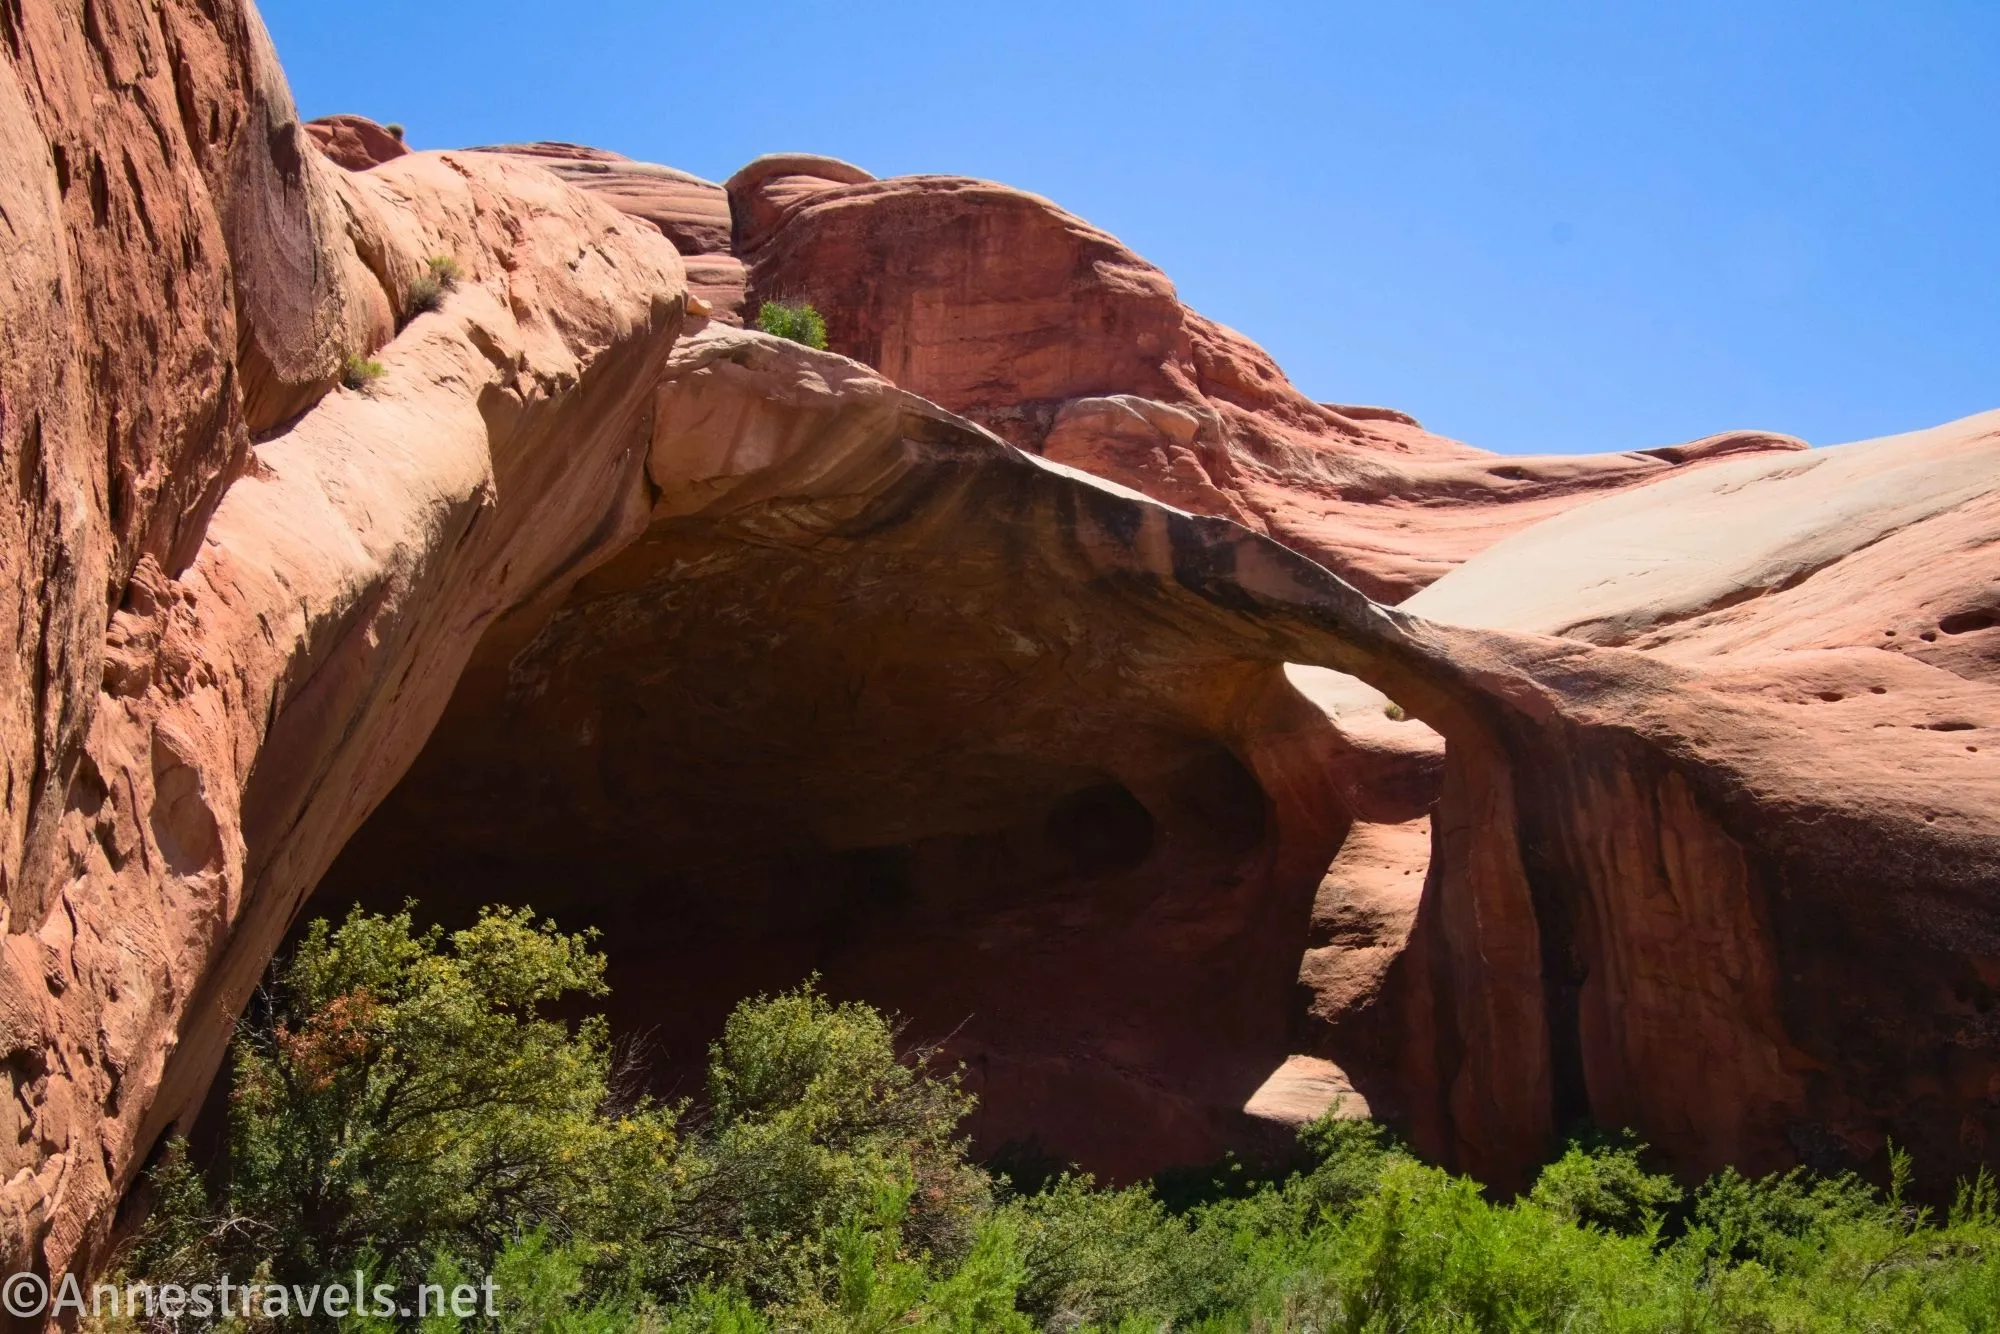
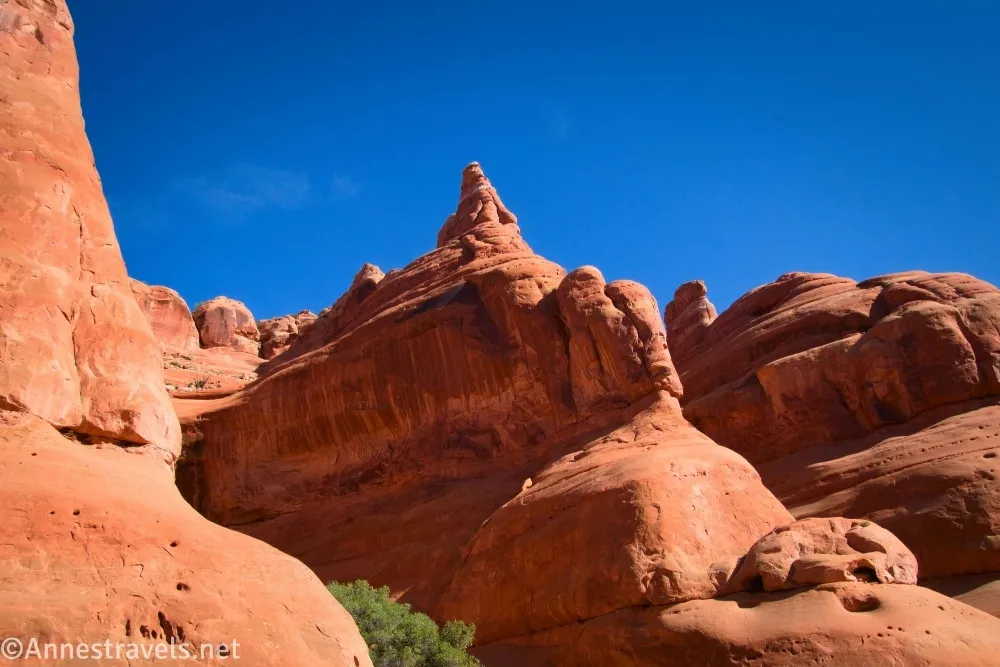
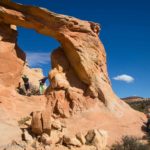
1.9 Cavern Arch (4,521ft.). This is the most impressive arch in Lost Spring Canyon and well worth visiting. I scrambled inside to look through the hole in the roof. Stay on top of the bench and continue to follow the social trail downcanyon. (38.7855950°, -109.5148740°)
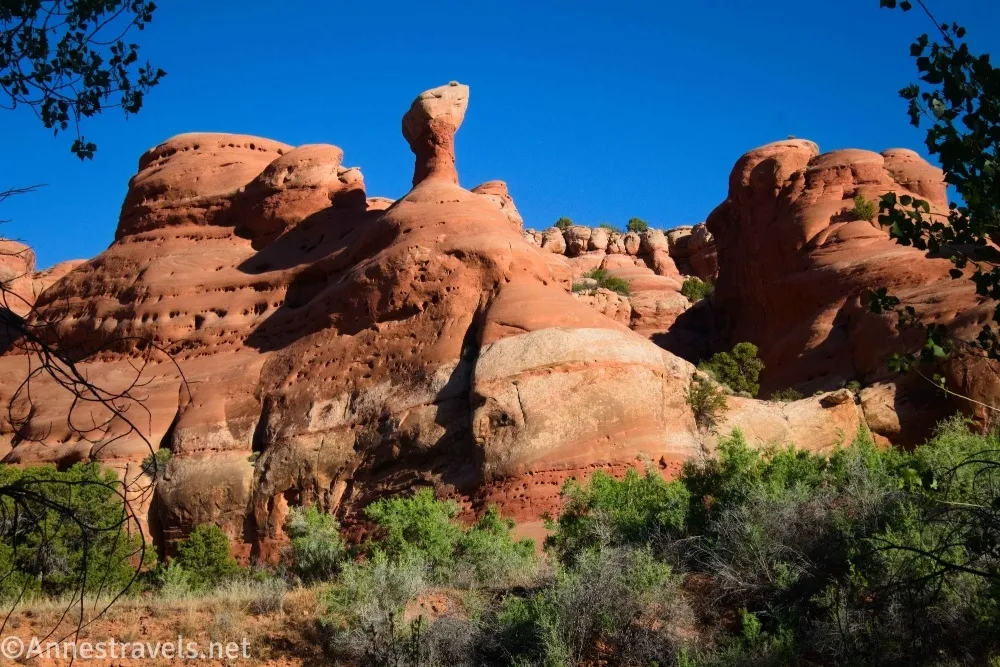
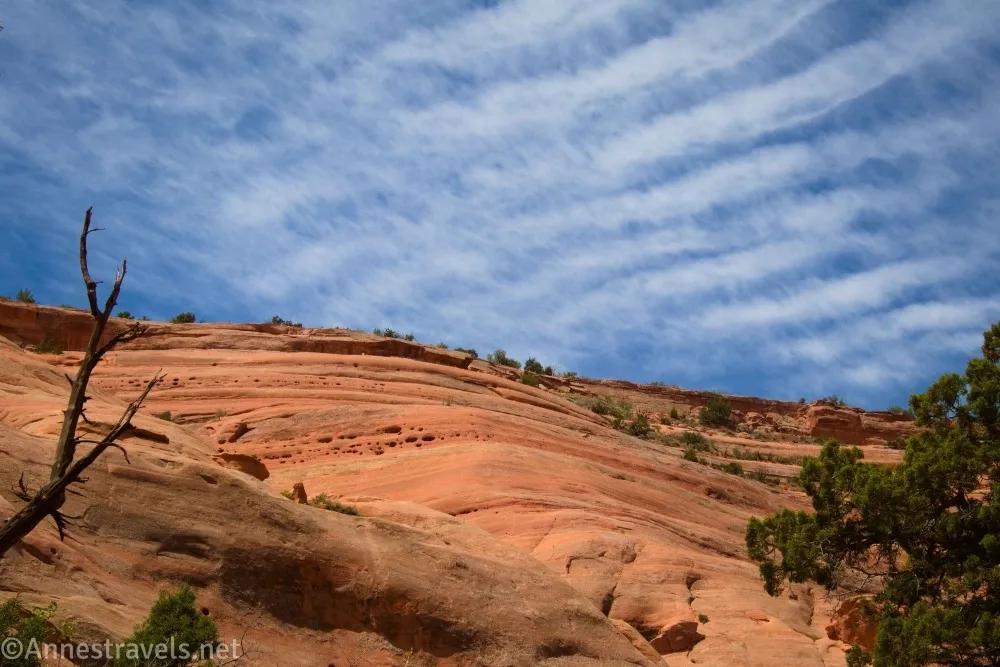
2.2 Millenium Arch (4,471ft.). The arch is on the left (eastern) canyon wall, which is pockmarked with dozens of holes. Birds sometimes nest in the holes, so keep your eyes open. The arch is in a pockmark that has a hole in its roof! After this, the social trail will drop back down into the main wash (I’d insert sad face here except we’re about to enter the most exciting part of the hike!) (38.7843970°, -109.5154100°)
2.5 Reenter Lost Spring Canyon wash (4,418ft.). Walk downstream (left) for a short distance. (38.7817000°, -109.5169830°)
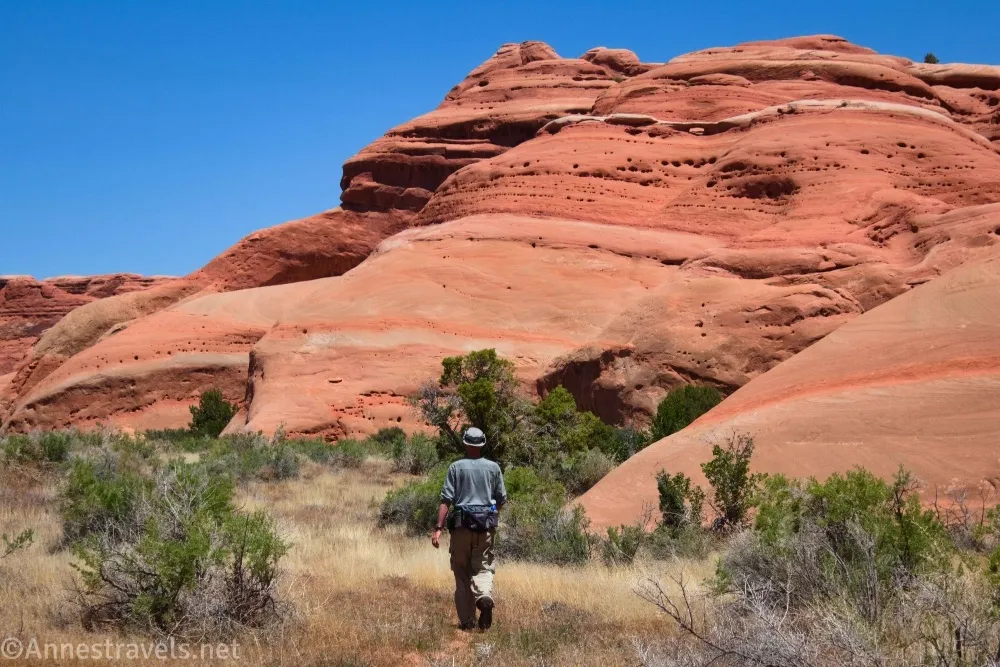
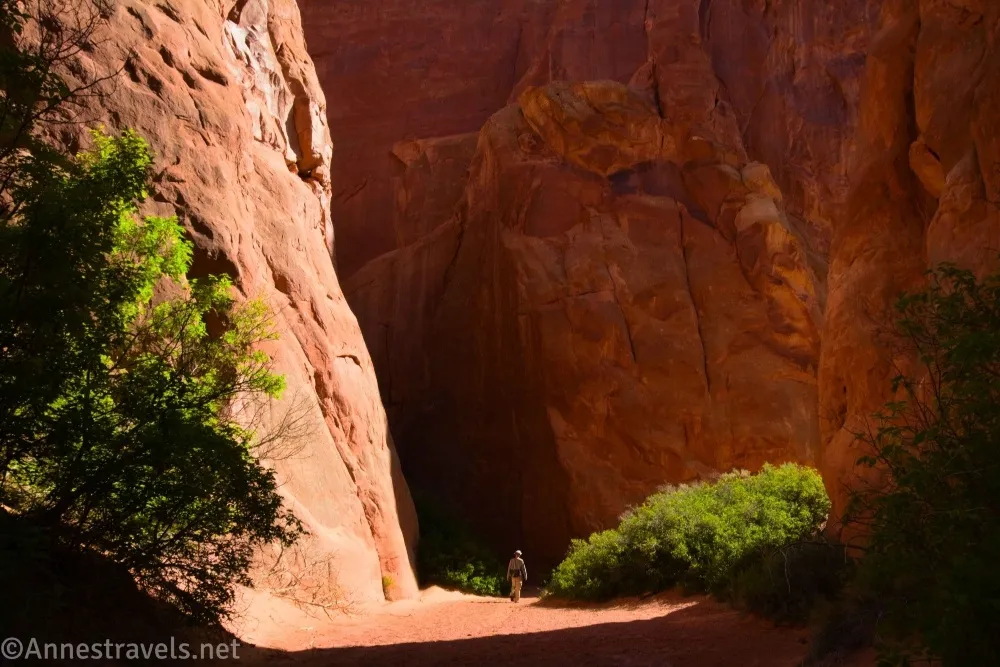
2.6 Covert Canyon enters from left (4,412ft.). The entrance is brushy, but this is where you want to turn left. (You could keep going down Lost Spring Canyon – it would eventually empty into Salt Creek Wash near Clover Canyon – but I hear it’s not very exciting (or maybe it’s just not as exciting as exploring Covert Canyon). Turn left up Covert Canyon, then stay left in what appears to be the main wash. It widens considerably after the initial narrow canyon mouth opening. Don’t worry; things will get more exciting later. (38.7807120°, -109.5175330°)
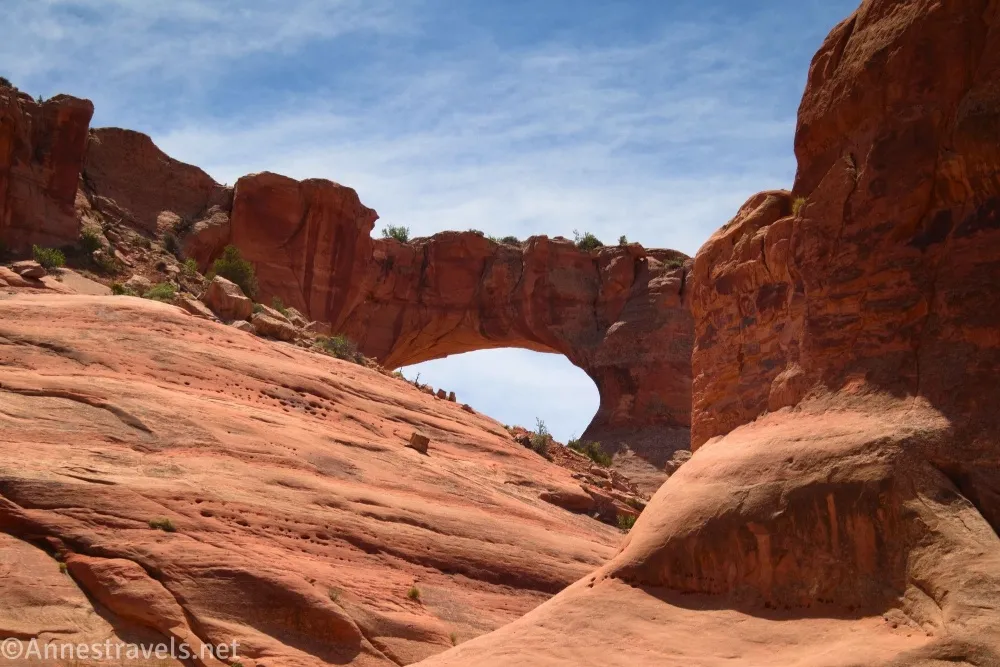
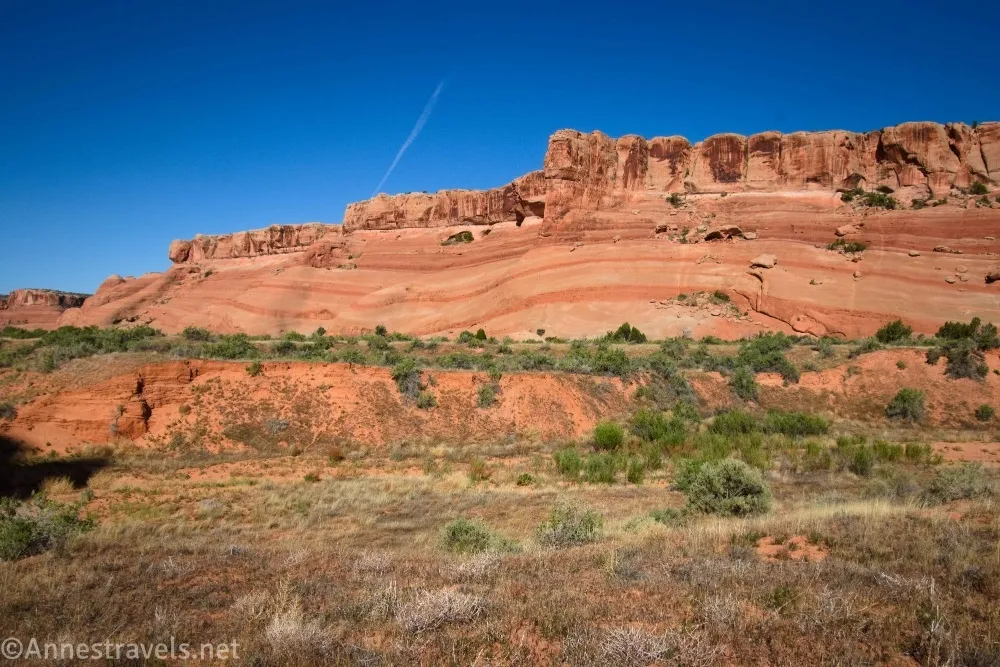
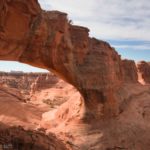
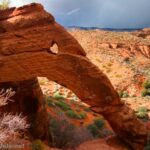
3.1 Covert Arch view (4,470ft.). Covert Arch is high on the righthand canyon wall. It’s very impressive from down here, though it’s also very impressive from the top of the canyon, as well (accessed from a different parking area). Actually, it’s easier to see before this, but closer up is more imrpressive. Admire the arch and then continue upcanyon as it begins to narrow and brush closes in on either side of the wash. (38.7834350°, -109.5093820°)
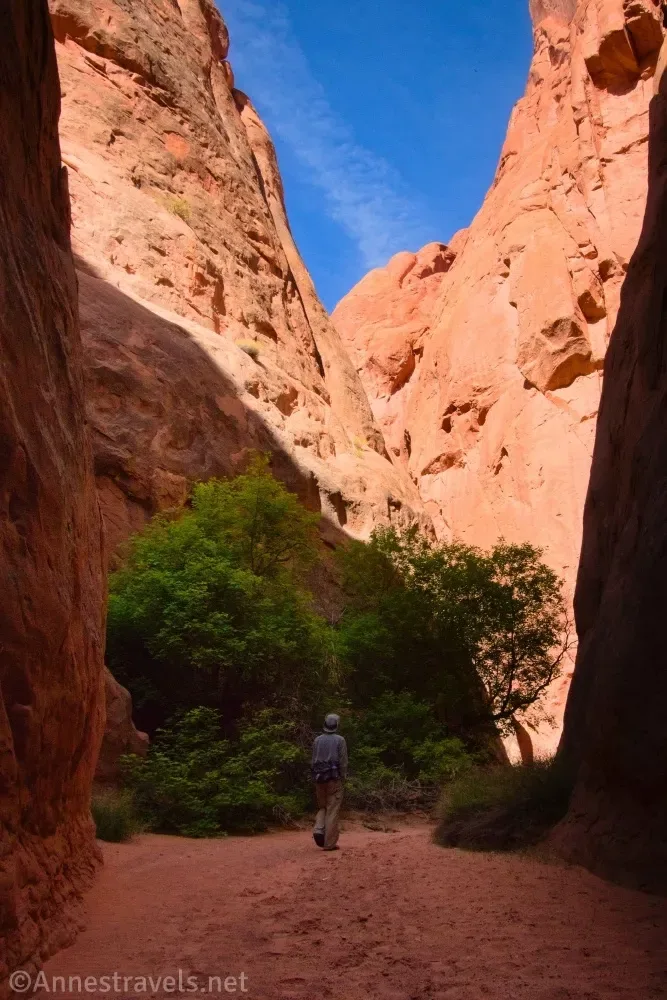
3.8 Wash split (4,564ft.). I’ll take you left first up Lost Found Canyon, as this is what I did and it worked quite well. The wash twists and turns and finally ends you up in a deep slot canyon – it’s never terribly narrow (those who were with me with a dislike of tight spaces thought it was neat not scary), but it’s so deep that you feel like a miniature. The canyon finally ends in a grotto. (38.7841530°, -109.5027240°)
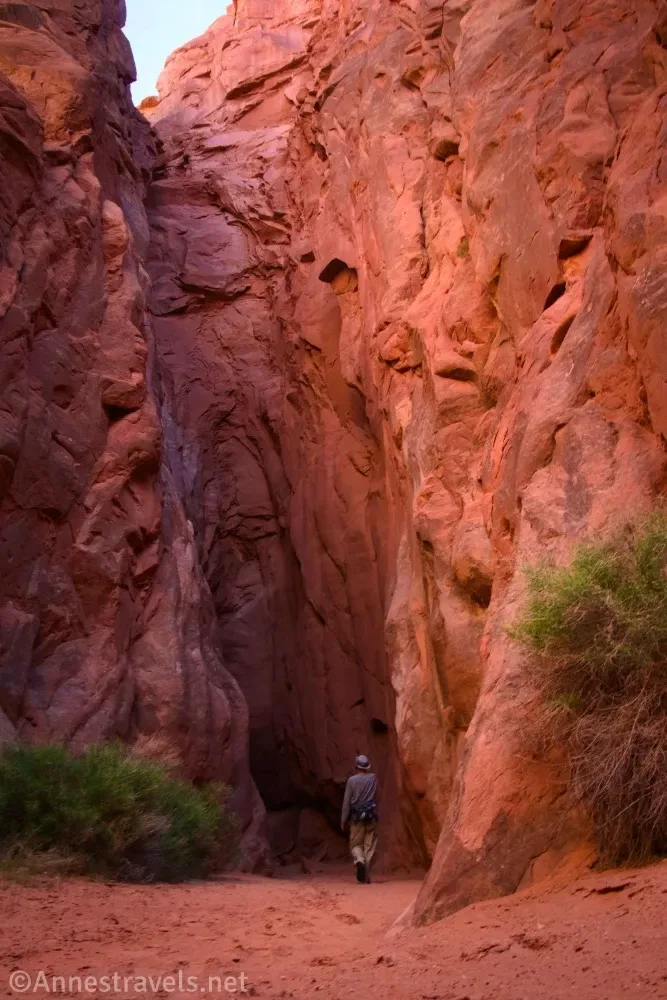
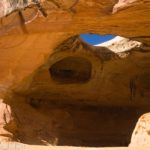
4.2 Grotto in Lost Found Canyon (4,692ft.). I hear this is a space where rock climbers like to rappel, but I saw zero people the entire day I spent in the area, so I didn’t actually see the rock climbers (the climbers seem to use the same parking area as I used for hiking to Covert Arch). Retrace your steps to the wash split and turn left up MMI Canyon. The route is brushy, but it’s generally quite hikable in this section. After a short distance, I saw a kind of sign pointing up a cliff on the right – I gather this is where the climbers exit the canyon system. But since I didn’t know that, I kept right on hiking up the canyon. (38.7855730°, -109.4966310°)
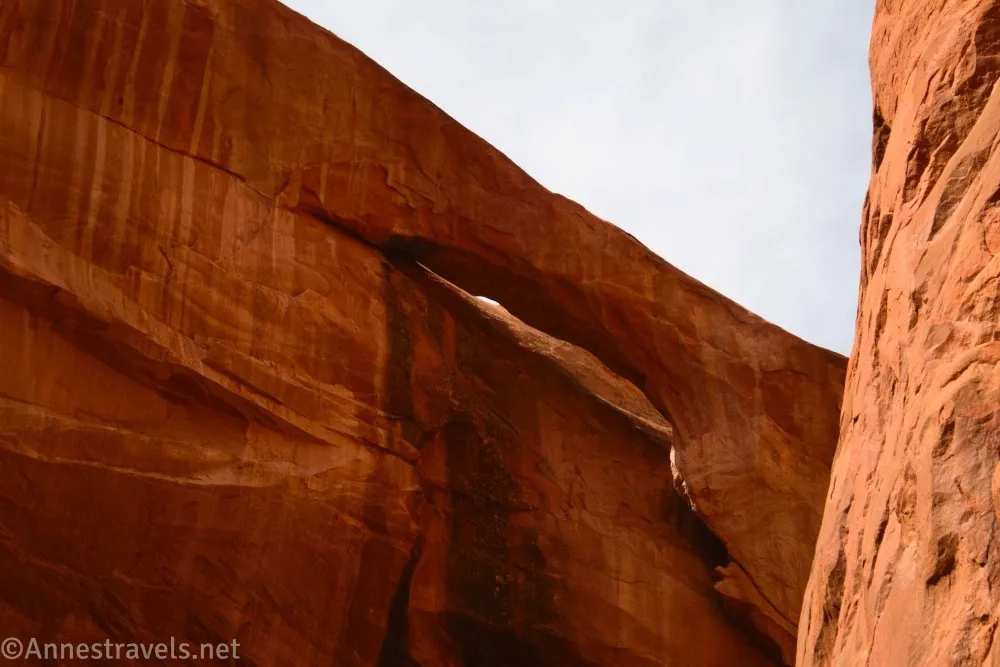
6.0 Alcove with an arch (4,733ft.). Look up and you’ll see sky through a crack in the roof of the alcove. This is a very good place to turn around, but I kept going a short distance further. The problem is that the wash becomes narrower and narrower, and the banks are covered in poison ivy. I was able to squeeze by one section without touching green plants, but I got to another section where it would have been impossible to not touch the greenery. The entire rest of my group is highly allergic to the stuff, so there was no way I was going to risk infecting them! (38.7803420°, -109.4935370°)
6.5 Turn around in MMI Canyon (4,655ft.). You could definitely continue farther if you’re immune to poison ivy. Retrace your steps to the traihead. (38.7808540°, -109.4909970°)
12.2 Lost Spring Canyon Trailhead (4,751ft.). I’m going to guess this is an overstatement when it comes to mileage… (38.8036410°, -109.5172500°)
Round Trip Trail Length: I went 12.2 miles supposedly, including a 0.2 mile accidental detour. It did not feel like 12 miles, through I do guess it was over 11 miles.
Elevation Gain: 3,105ft. (4,733ft. to 4,411ft.) supposedly. Again, I’m pretty sure this is an overestimate because my GPS struggles to get an accurate estimate when I hike too close to canyon walls.
Facilities: None
Fees: None
Trail Notes: If you plan to rock climb, you’ll need to follow the regulations put forth by Arches National Park (which includes getting a (I believe free) permit). Bring shoes or boots that are good in sand, as the wash bottom is sandy – taking the bench trail definitely is helpful with making the hike easier. Pay attention to your turns so you can find your way back. If you want to get an early start – or if you get back late – because the parking area is on BLM land, it’s legal to park overnight. You can also camp legally before entering the park.
Trail 
![]()
![]()
![]()
Road ![]()
![]()
![]()
Signs ![]()
![]()
![]()
![]()
Scenery ![]()
Would I go 100 miles out of my way for this? ![]()
Overall Rating: 
![]()
![]()
GPS Coordinates for Lost Spring Canyon
TH: 38.8036410°, -109.5172500° (38°48.21846′, -109°31.03500′ / 38°48’13.1076″, -109°31’02.1000″) (4,751ft.) (0.0)
Fence: 38.8012830°, -109.5166850° (38°48.07698′, -109°31.00110′ / 38°48’04.6188″, -109°31’00.0660″) (4,734ft.) (0.19)
Enter Wash: 38.7969170°, -109.5129990° (38°47.81502′, -109°30.77994′ / 38°47’48.9012″, -109°30’46.7964″) (4,497ft.) (0.89)
Split (be sure to take the left fork on the way back up!): 38.7936250°, -109.5139950° (38°47.61750′, -109°30.83970′ / 38°47’37.0500″, -109°30’50.3820″) (4,460ft.) (1.19)

Turn Right for Lightening Bolt Arch: 38.7893470°, -109.5163710° (38°47.36082′, -109°30.98226′ / 38°47’21.6492″, -109°30’58.9356″) (4,450ft.) (1.60)
Lightening Bolt Arch: 38.7896280°, -109.5169490° (38°47.37768′, -109°31.01694′ / 38°47’22.6608″, -109°31’01.0164″) (4,478ft.) (1.64)
Turn left for Cavern Arch: 38.7864180°, -109.5161300° (38°47.18508′, -109°30.96780′ / 38°47’11.1048″, -109°30’58.0680″) (4,442ft.) (1.99)
Cavern Arch: 38.7855950°, -109.5148740° (38°47.13570′, -109°30.89244′ / 38°47’08.1420″, -109°30’53.5464″) (4,521ft.) (2.14)
Beneath Millennium Arch: 38.7843970°, -109.5154100° (38°47.06382′, -109°30.92460′ / 38°47’03.8292″, -109°30’55.4760″) (4,471ft.) (2.45)
Reenter Wash: 38.7817000°, -109.5169830° (38°46.90200′, -109°31.01898′ / 38°46’54.1200″, -109°31’01.1388″) (4,418ft.) (2.70)
Turn left up side canyon: 38.7807120°, -109.5175330° (38°46.84272′, -109°31.05198′ / 38°46’50.5632″, -109°31’03.1188″) (4,412ft.) (2.78)
Covert Arch View: 38.7834350°, -109.5093820° (38°47.00610′, -109°30.56292′ / 38°47’00.3660″, -109°30’33.7752″) (4,470ft.) (3.36)
Wash junction (left for tall walls/dryfall; right for Exit Route): 38.7841530°, -109.5027240° (38°47.04918′, -109°30.16344′ / 38°47’02.9508″, -109°30’09.8064″) (4,564ft.) (3.36)
Grotto (this is in Lost Found Canyon): 38.7855730°, -109.4966310° (38°47.13438′, -109°29.79786′ / 38°47’08.0628″, -109°29’47.8716″) (4,692ft.) (4.45)
Alcove + Arches: 38.7808650°, -109.4939810° (38°46.85190′, -109°29.63886′ / 38°46’51.1140″, -109°29’38.3316″) (actually 38.7803420°, -109.4935370° (38°46.82052′, -109°29.61222′ / 38°46’49.2312″, -109°29’36.7332″)) (4,733ft.) (6.23)
Turn around (this is called MMI Canyon): 38.7808540°, -109.4909970° (38°46.85124′, -109°29.45982′ / 38°46’51.0744″, -109°29’27.5892″) (4,655ft.) (6.68)

Back into the wash (after taking the upper route: 38.7924550°, -109.5149630° (38°47.54730′, -109°30.89778′ / 38°47’32.8380″, -109°30’53.8668″) (4,480ft.) (10.94)
Road junction (where you should turn and not go to the fence): 38.8016480°, -109.5165090° (38°48.09888′, -109°30.99054′ / 38°48’05.9328″, -109°30’59.4324″) (4,733ft.) (12.2)
End: 38.8034690°, -109.5175010° (38°48.20814′, -109°31.05006′ / 38°48’12.4884″, -109°31’03.0036″) (4,755ft.) (12.19)
The gpx file for my hike in Lost Spring Canyon can be downloaded – please note that this and the GPS Coordinates are for reference only and should not be used as a sole resource when hiking this trail.
Download GPX File size: 139.5 KB Downloaded 128 times
(Note: I do my best to ensure that all downloads, the webpage, etc. are virus-free and accurate; however, I cannot be held responsible for any damage that might result, including but not limited to loss of data, damages to hardware, harm to users, from use of files, information, etc. from this website. Thanks!)
Getting to the Lost Spring Canyon Trailhead
From I-70, take Exit 193, signed for Yellowcat (no services). Turn south on the dirt road – all of my mileages are from the westbound entrance/exit ramps. (I hear there are two other ways of getting in – one from US-191 (I tried that and it was flooded and too sketchy for my van) and another from Owl Draw Road off of UT-128, but neither of these are recommended for 2WD vehicles).
After 6.2 miles, a road will go off on the right (west) at approx. 38.8679514, -109.5499733. Continue straight (south) to mile 7.8, where you want to go left at a Y in the road (approx. 38.8489544, -109.5358285). A half a mile beyond this Y, you will see a couple of old ore hoppers on the left (north) about 38.8479059, -109.5283851. This is the Yellowcat Mine.
Keep driving to mile 9.3. Take the road that goes right (south) about 38.8504449, -109.5107063. At mile 12.0 (approx. 38.8242522, -109.4966222), turn right on a road on the right leads west and south to the trailhead for Lost Spring Canyon after about 4.8 miles from the main road.
Hike the Best Trails in Arches
Dig deep into the park’s trails, especially the ones the author feels are best! Buy your copy here.

2 responses to “Lost Spring Canyon and its Side Canyons”
[…] Our first stop in Utah was in the Yellowcat Flat region northeast of Moab. From here, we hiked to a great view into Lost Spring Canyon… […]
[…] risk getting stuck (2WD does have its disadvantages some days). Instead, we headed for the Lost Spring Canyon Trailhead. And what a hike it turned out to be! The views of the La Sal Mountains were great, but […]