
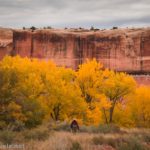
Arches National Park is known for being overrun, but there are ways to get away from the crowds. Visit very early in the morning, or go in late November-February, and while you might not have the popular areas to yourself, “crowded” would be pushing the definition. Another way to beat the crowds and still enjoy nice weather (usually April-early May and October-early November) is to explore trails and routes off of dirt roads in the western part of the park. These include Tower Arch and Eagle Park off of the 2WD-friendly Salt Valley Road and Eye of the Whale Arch, Leaping Arch, and forreys into Herdina Park from the West Valley Jeep Road (sometimes called “4×4 Jeep Road” – and they mean it!). Today, I’ll talk about hiking the short trail to Eye of the Whale Arch and then how to explore Whale Canyon – an off-trail adventure accessed from the arch.
Quick Stats
This post contains affiliate links. Clicking on them and purchasing an item supports me without any extra cost to you.
First, let’s talk difficulty. Eye of the Whale Arch is an easy trek of only 0.5 miles round trip. It’s a favorite with 4×4 tours, so expect to see a few people with their tour guide (the jeeps only hold about 5-7 people, so it’s rarely crowded). Between each tour group, you’ll likely have the arch to yourself.
Whale Canyon is quite a bit more difficult. First, it requires off-trail skills. I found a way to access the canyon that’s moderate to strenuous Class 2 scrambling, though there is an alternate Class 3+ route that cuts off a bit of distance. While traveling downcanyon, there is one move I would consider Class 4 – it’s not difficult at all, but you’re bypassing a dryfall on a ledge that slopes steeply toward the canyon. There are no good handholds, and the ledge is a little sandy/slippery. It certainly gave me pause. But I did I it, I didn’t fall, and I didn’t use the climbing rope I’d brought.
The West Valley Jeep Road (4×4 Jeep Road) is just that – a jeep road. I would have loved to take my high clearance, 2WD van from the Willow Springs Road up to the trailhead, but there was no chance we could do it without 4×4. Even 4×4 vehicles would get to the first big hill, spin out, and turn around. Instead, we ended up parking along the Willow Springs Road near its junction with the West Valley Jeep Road and walked the 1.9 miles to the trailhead. The good news is that the road is extremely scenic, so it wasn’t much of a hardship to have to walk it. One word of warning for jeepers: The West Valley Jeep Road is exceedingly narrow, and there is one hill right near its southern end that is very difficult if traveling south to north (remember those 4×4 vehicles spinning out?). Because of these conditions, it’s recommended (and considered courteous among the jeep community) to travel north to south whenever possible. That said, no one will yell at you if you want to drive south to north to the Eye of the Whale Trailhead.
With that all out of the way, let’s get down to the trail (route?) guide!

To Get to Eye of the Whale Arch…

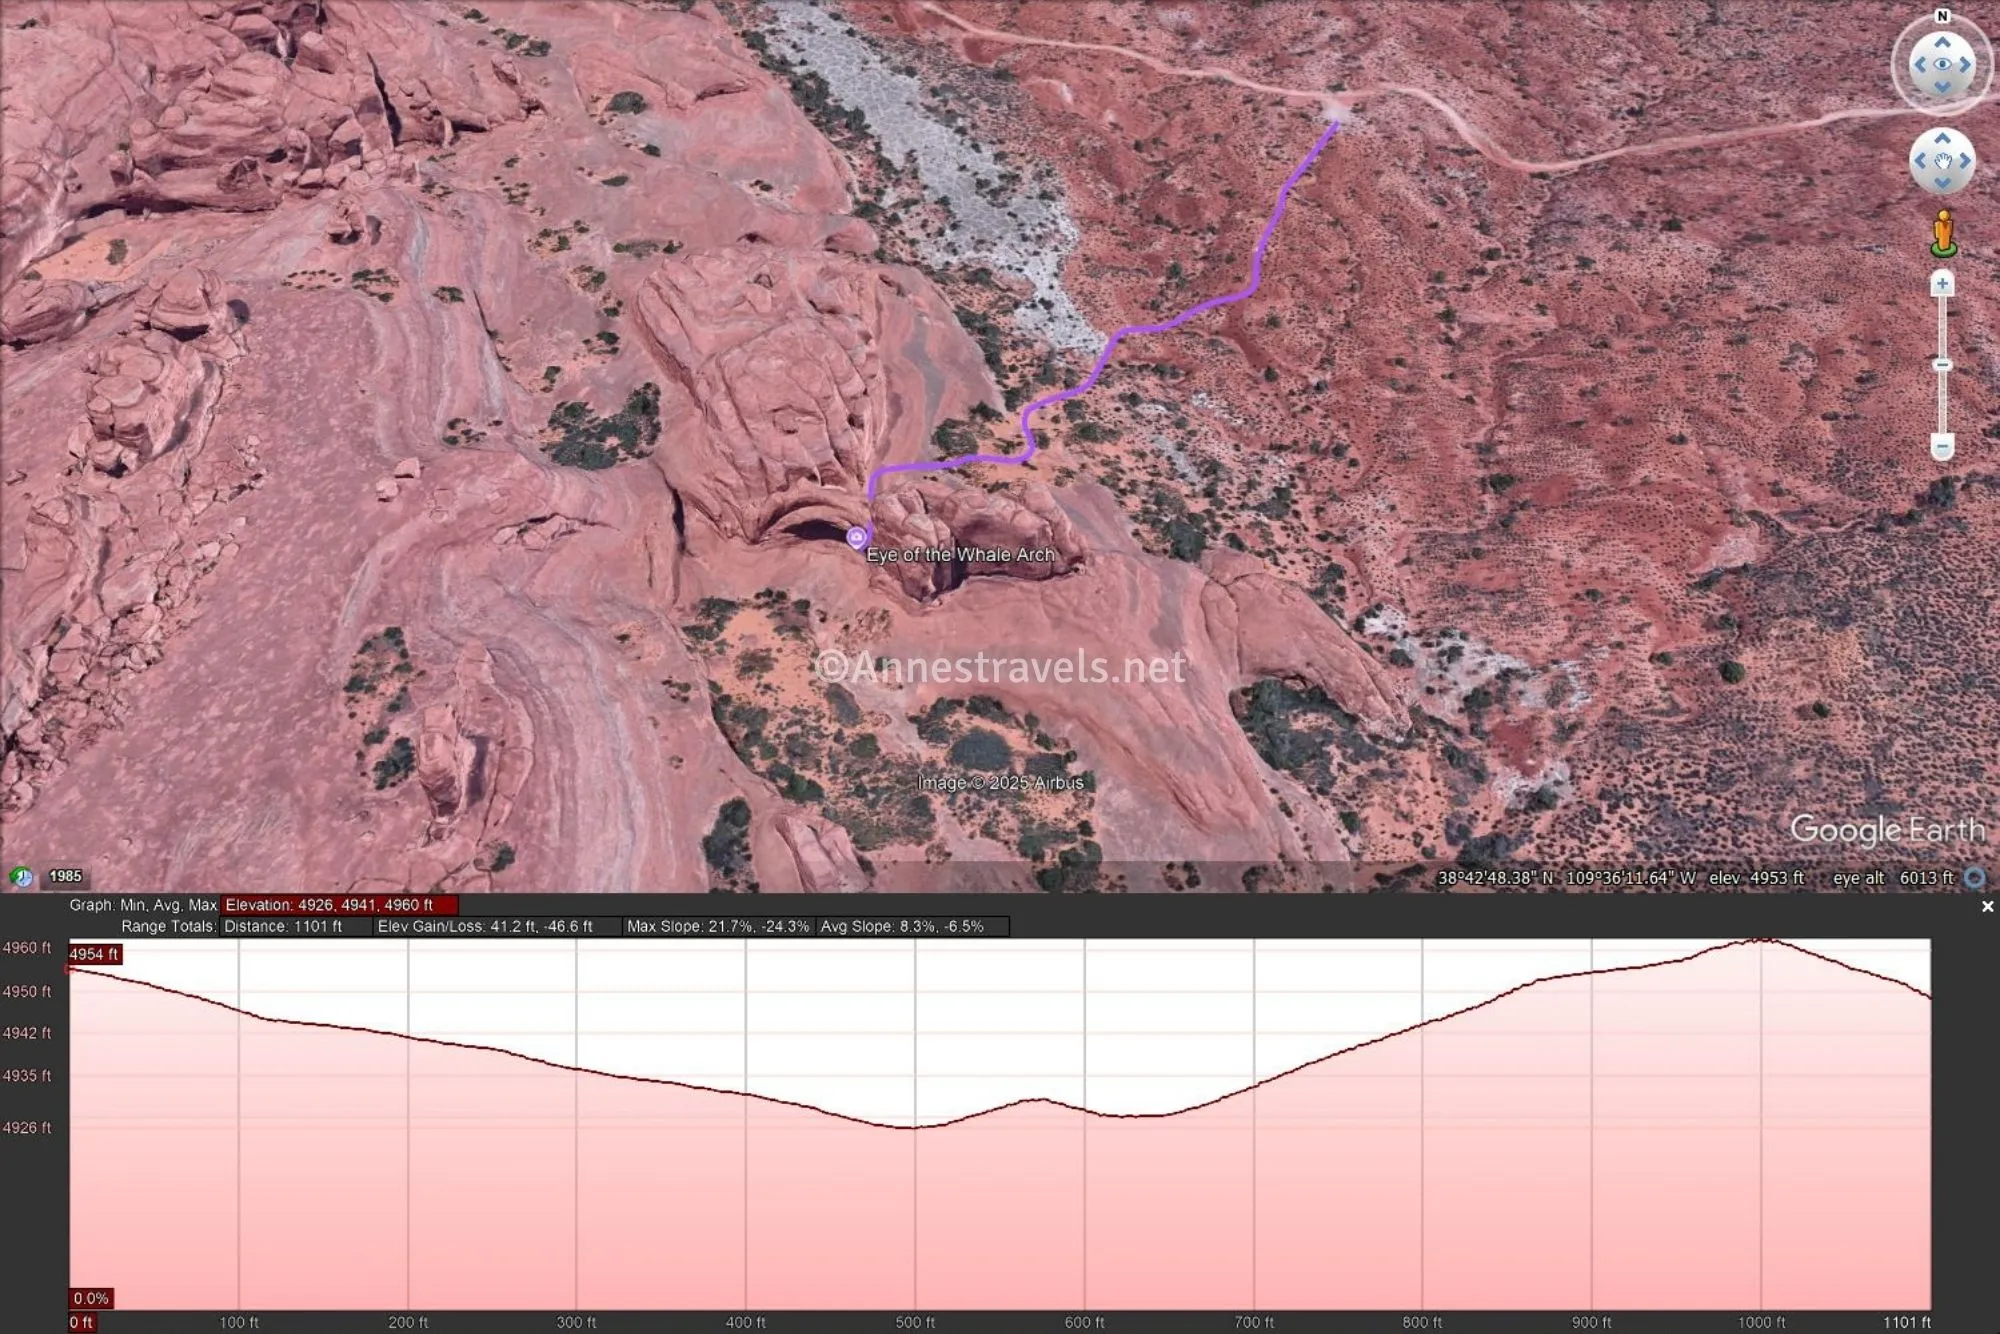
0.0 Eye of the Whale Arch Trailhead (4,954ft.). Follow the trail south toward the arch, which should be visible from the parking area. The route crosses a wash before ascending up to the arch. In general, this trail is easy to follow, though you may need to keep your eyes open for cairns as you’re crossing slickrock the second half of the hike. (38.715241°, -109.601724°)
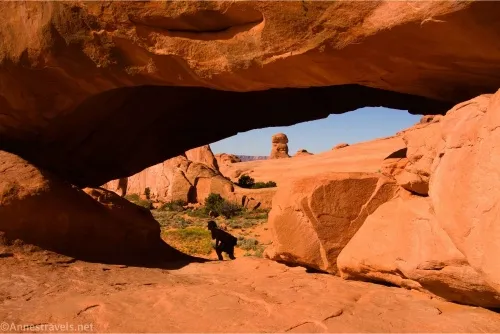
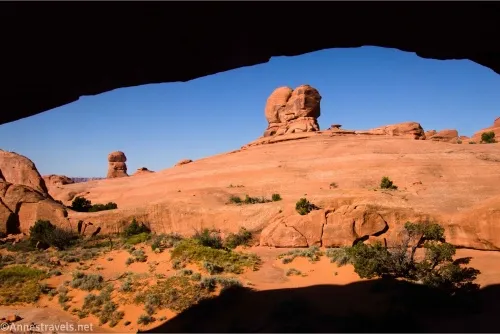
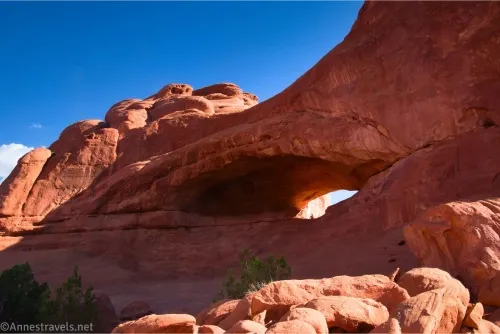
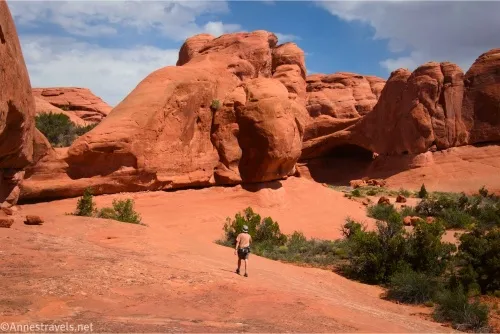
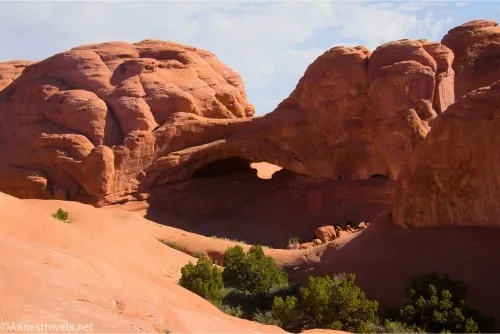
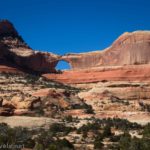
0.2 Eye of the Whale Arch (4,949ft.). To get the best views, pass under the arch and, staying on slickrock, walk to the other side of the “bowl” below the arch to look at it from the southwest – from this angle, it looks like the eye of a whale! (38.713068°, -109.603672°)
To get to Whale Canyon…

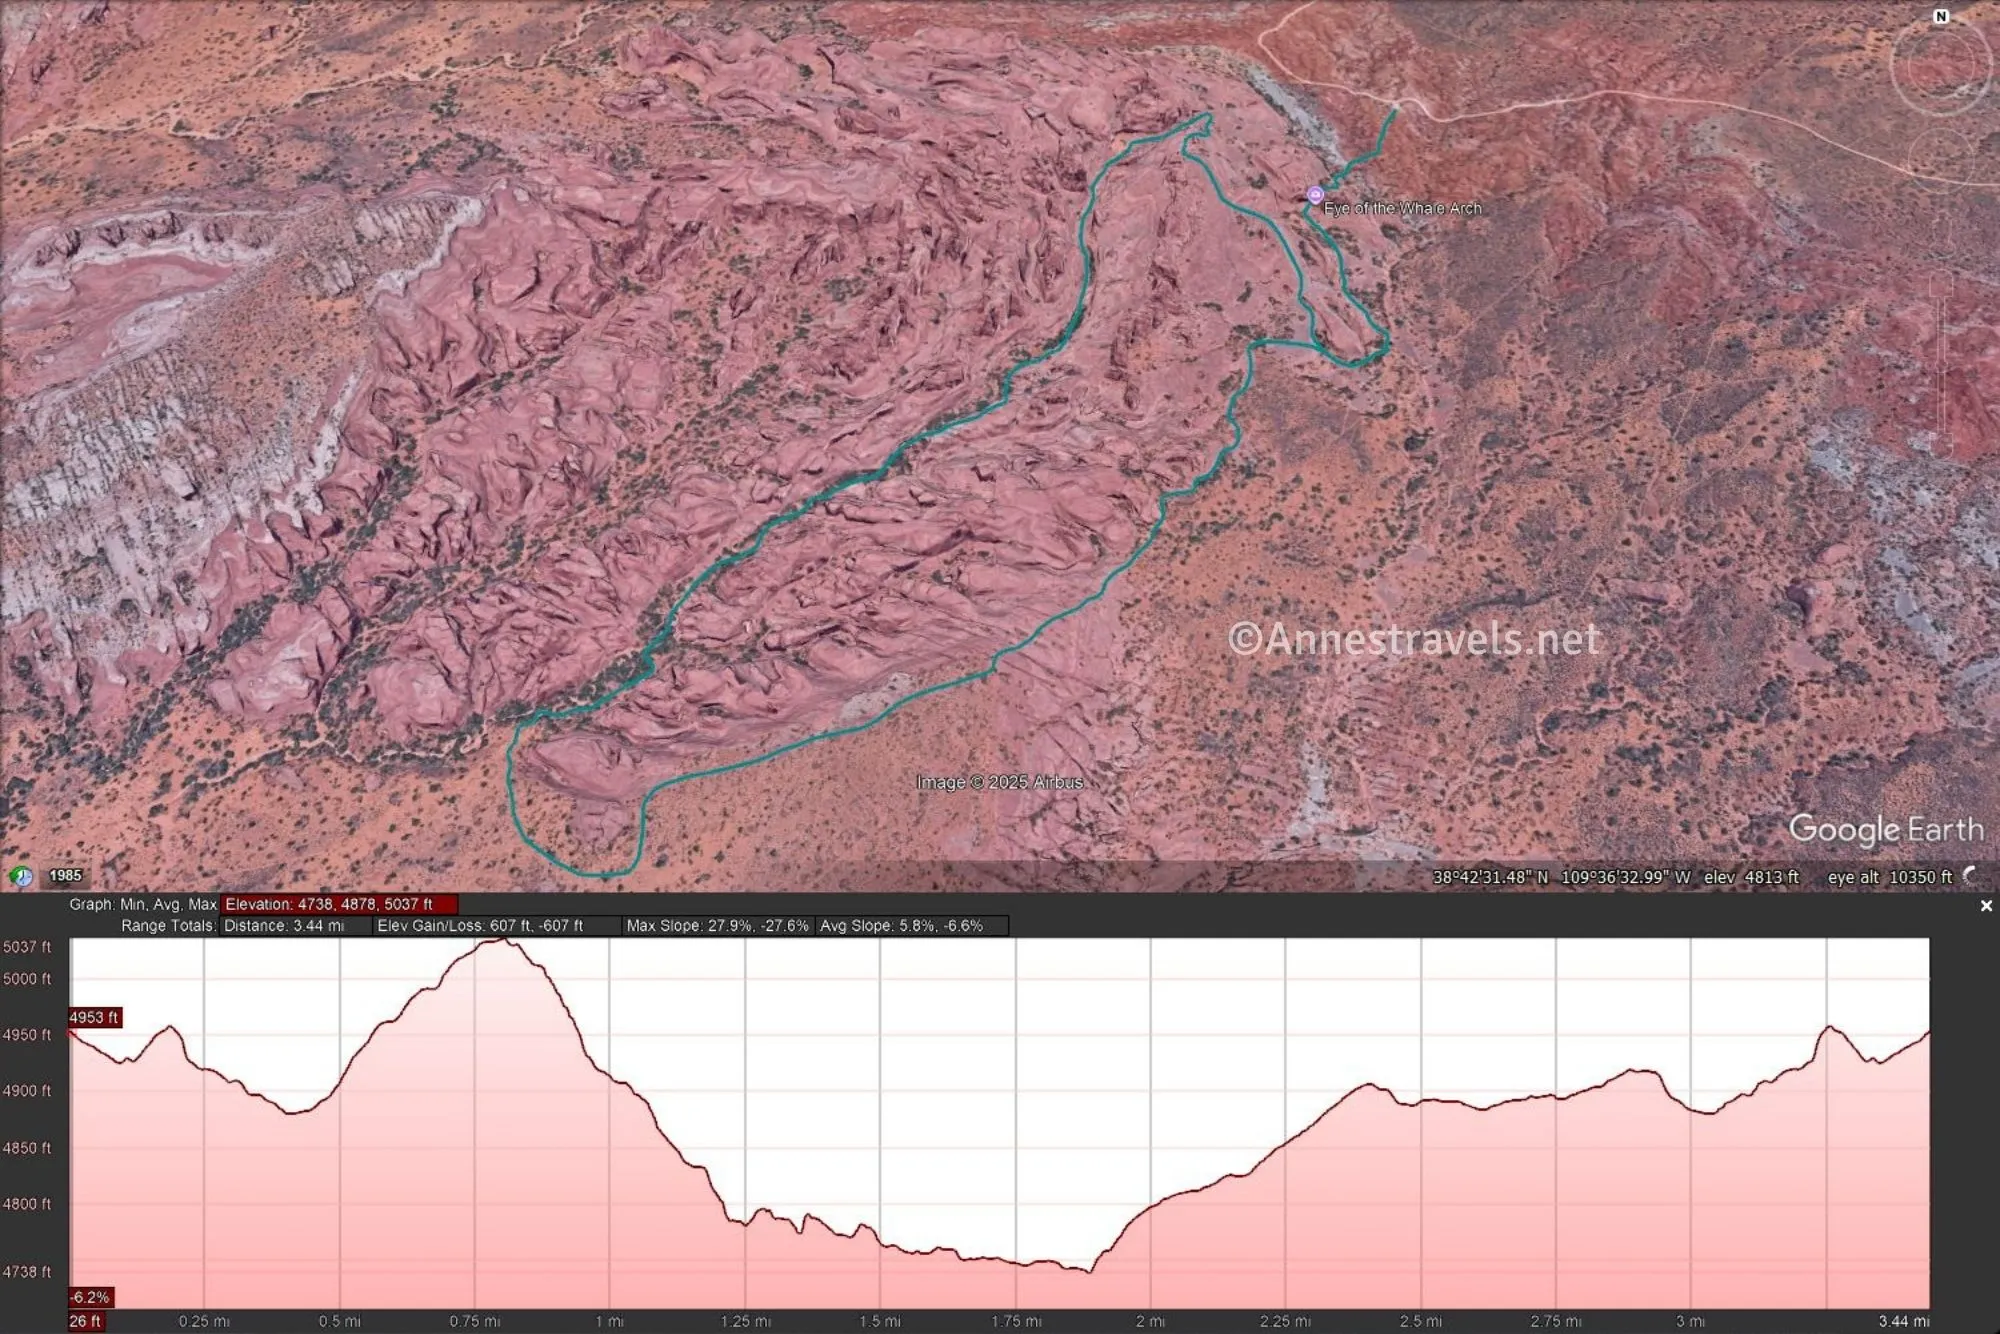
0.2 Eye of the Whale Arch (4,949ft.). Pass through the arch and, staying on slickrock, walk to the other side of the “bowl” below the arch. From here, you’ll need to cross the sandstone fin (it looks like a cliff) on the right – you have two choices. 1) Those who love Class 3+ scrambling (and are tall) can locate a small hand-crack that leads up to a tree (the tree is about 38.712670°, -109.604344°) and then walk right up to a pass in the sandstone domes. Scramble down the other side to the flatter sandstone shelf. 2) If you’re not so fond of scrambling (or just aren’t that tall), a much easier route can be found further south via a sandstone ramp. The mileages reflect the southerly, easier slickrock ramp route. (My companion did the hand-crack route and said it was fun, but I’m 9 inches shorter than him and couldn’t get up it, so I had to take the easy route instead.) To get to the slickrock ramp, walk south, staying mostly on slickrock and keeping the rock wall on your right. Round the end of the slickrock fin and then head north up a Class 2 slickrock ramp that begins about 38.710254°, -109.603975° (about mile 0.5) (this is also where your return route will reconnect with your outward route no matter which route you take on your outbound journey). The handcrack route and the easier route via the ramp will meet up at approximately 38.712842°, -109.605237° (mile 0.7). Keep walking generally north almost to the head of Whale Canyon, which will appear on the left. (38.713068°, -109.603672°)

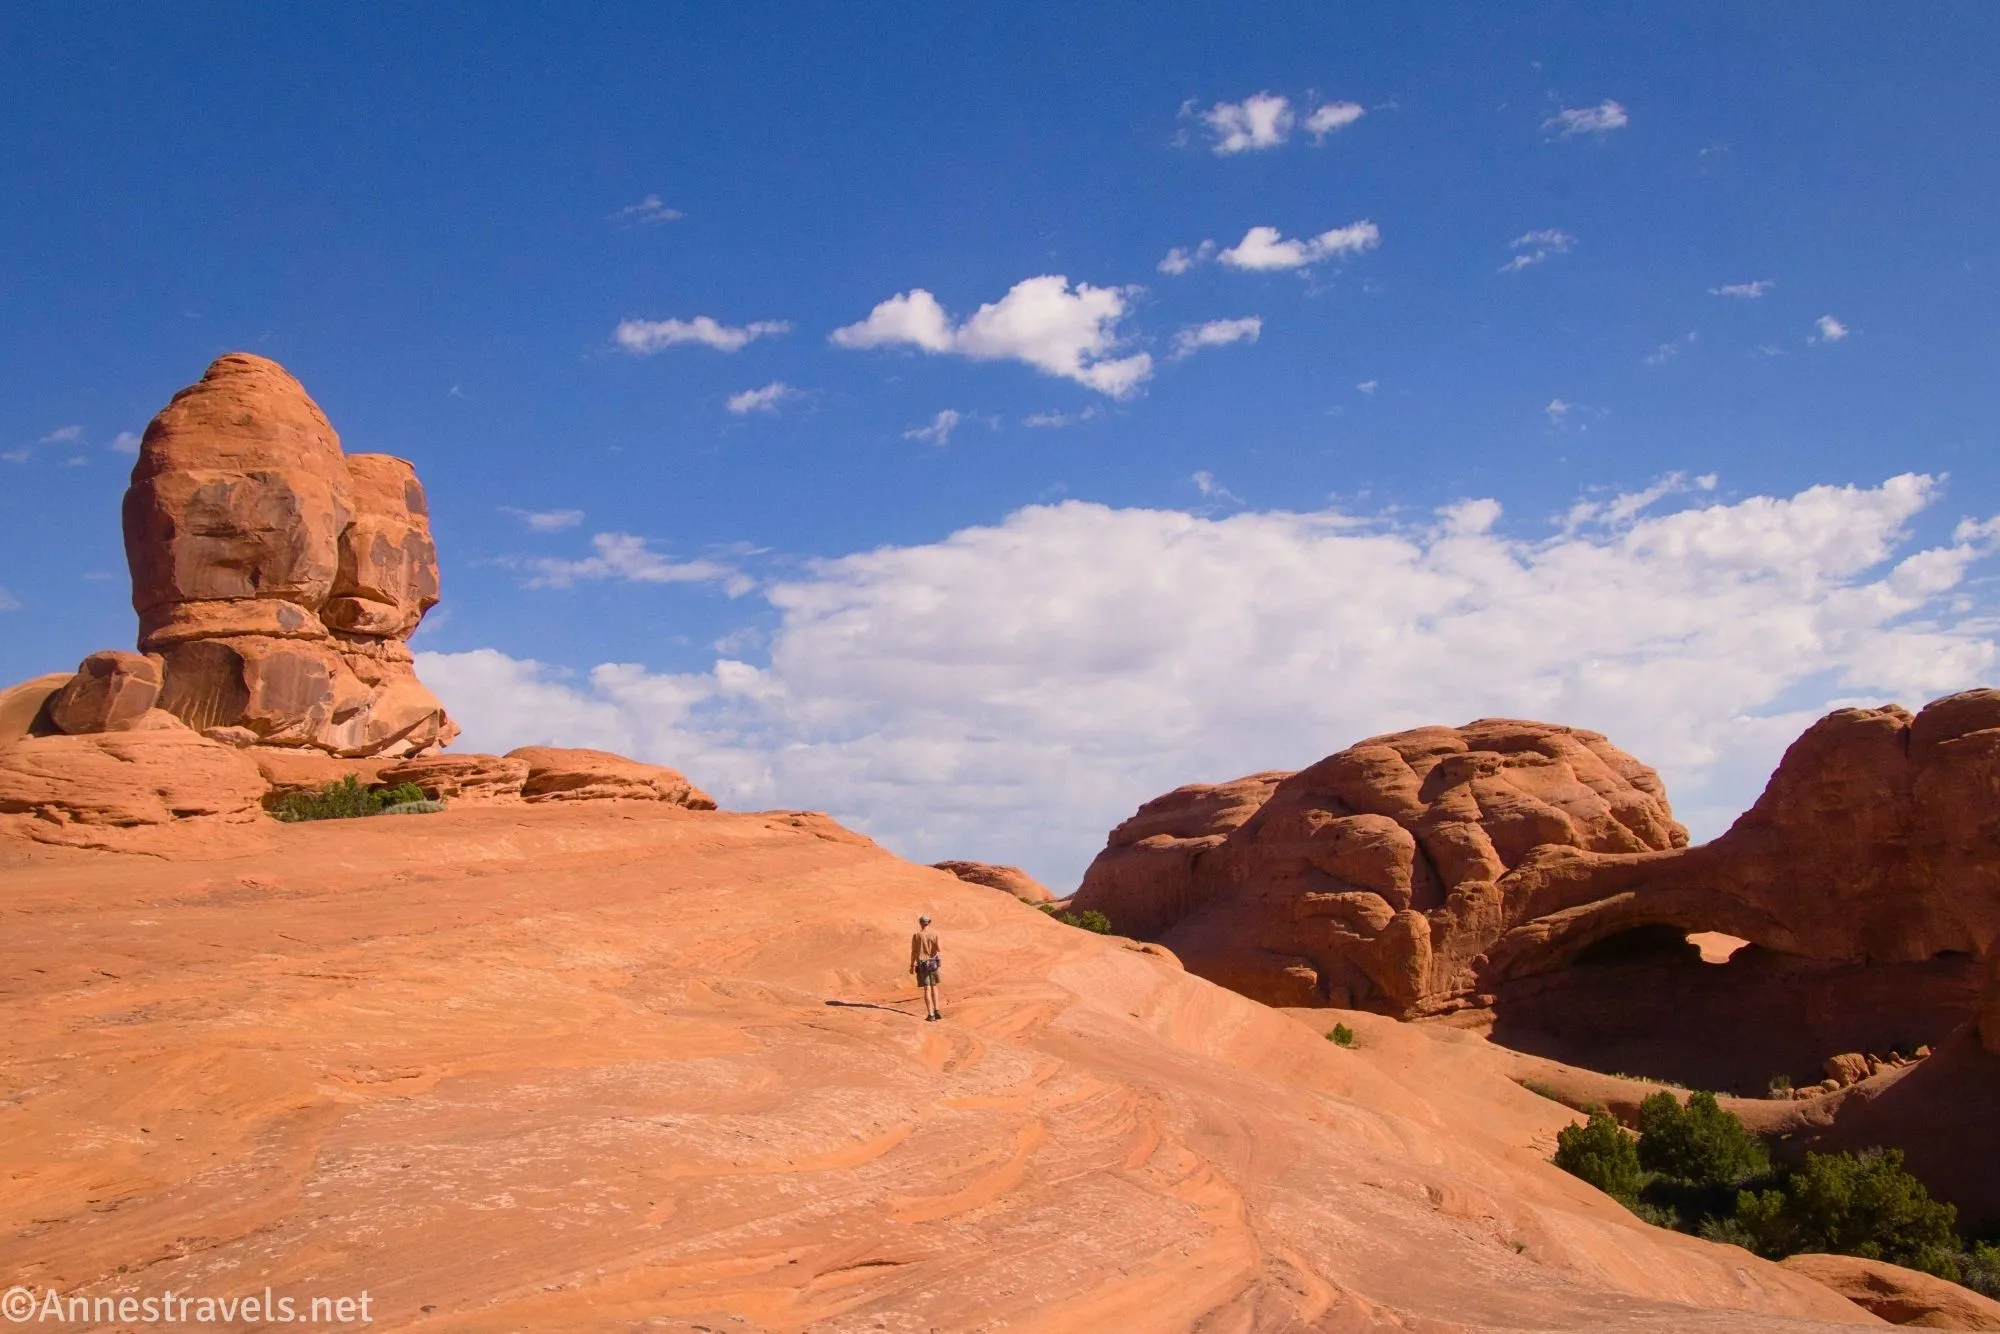
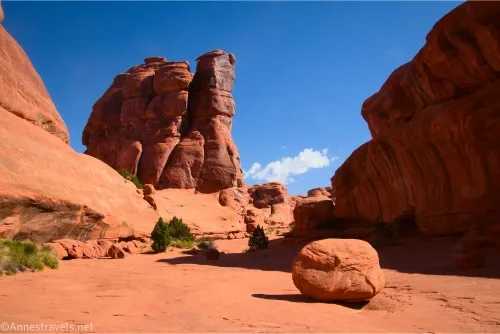
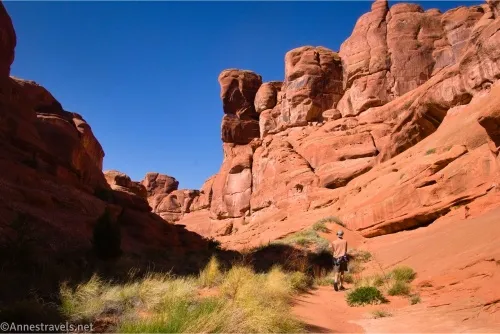
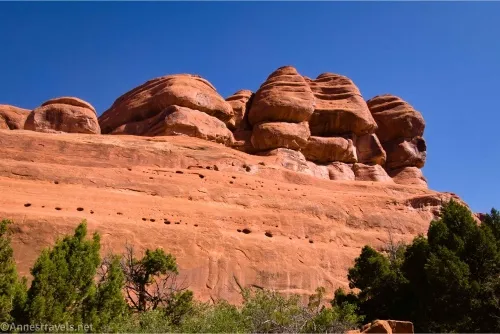
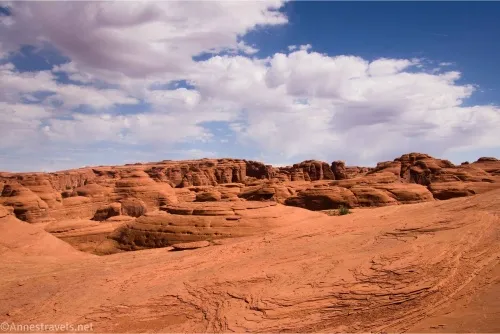
0.9 Head of Whale Canyon (5,002). There are lots of rock formations in this area, so make sure to look around before following a drainage down into Whale Canyon – your next adventure is to descend the canyon. Enjoy the rock formations in this area as you start scrambling down. Walking downcanyon is easy at first with a few very small dryfalls. At a slightly more major dryfall, downclimb or bypass via a ledge on the right. (38.7150000°, -109.6052778°)
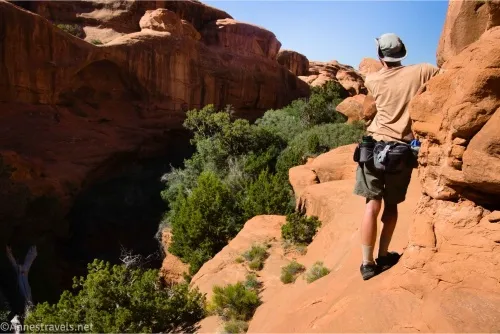
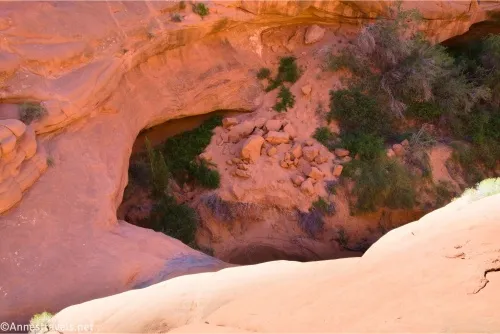
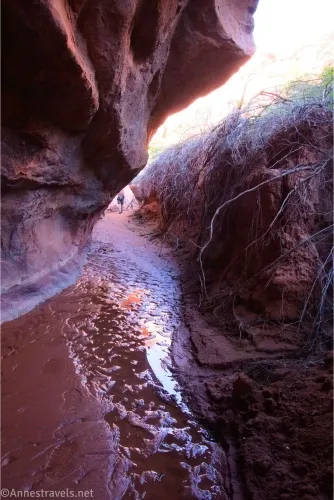
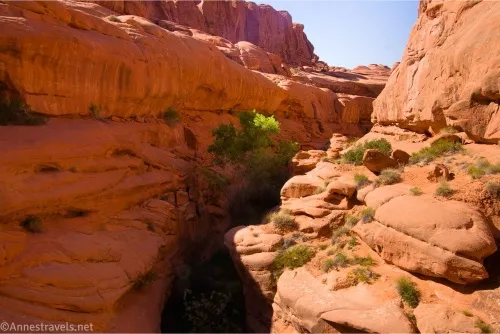
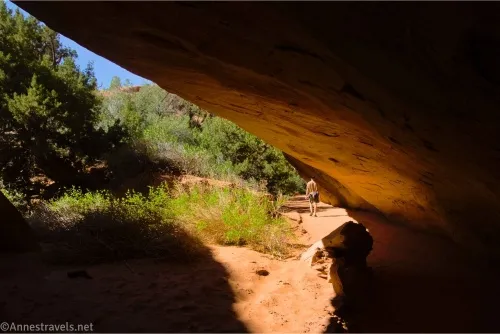
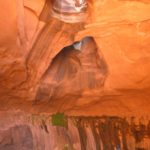
1.2 Difficult Dryfall (4,802ft.). Shortly beyond the slightly more major dryfall, a second dryfall poses a more difficult obstacle. The right side of the canyon offers a bypass, but rounding the corner requires at least two very exposed moves. The issue is that the slickrock shelf on which you’re walking slopes down to a sheer drop to the canyon bottom. Not exactly great for the nerves! (There is no shame if you decide you simply can’t do this move – you can retrace your steps to the bottom of the ramp. From there, head south, staying as much as possible on slickrock and keeping the taller rocks on your right until you can scramble down into the canyon via the exit – then you can walk the canyon bottom-up!) Once beyond the dryfall, find a way to scramble down an animal trail or generally bushwhack your way to the canyon bottom (which sounds easier than it is in real life due to thick scrub oak and sketchy/steep sand bluffs). Walk down the now-mellow canyon as it passes beneath a ledge on the left side of the canyon with a sandy bank on the right – a small spring is popular with animals in this section and can make the tread damp. The route emerges from under the ledge into a sandy wash with tall (if not narrow) walls. Pass behind (to the right of) a collapsed section of canyon wall which creates a small cave on the right side of the canyon. Beyond this, pay attention to the canyon walls – you’re looking for the canyon wall on the left to drop into dirt and brush, and no longer rock walls. (38.711485°, -109.607797°)
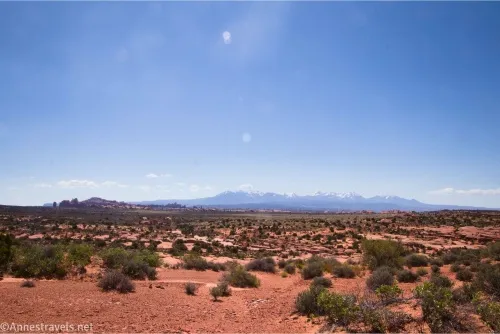
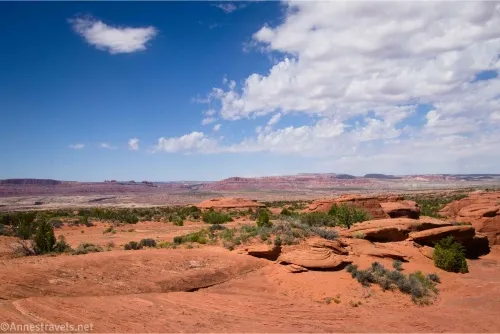
1.9 Exit Whale Canyon (4,736ft.). Fairly soon after the rock wall on the left (east) turns to a high, sandy bank, a social path leads up into the desert. Take this, then stay left (north) to drop into a slickrock drainage along the last of the slickrock cliffs. Head east and north, keeping the slickrock domes close on your left. You should be able to do all or nearly all of this section of the hike in washes or on slickrock, so there’s no excuse to walk across soil. Be sure to look around, as the scenery is quite pretty, especially toward the La Sal Mountains. Head for the end of the fin where you turned up the ramp to ascend to the head of Whale Canyon; from here, it’s an easy walk on slickrock (with the cliff on your left) back to Eye of the Whale Arch, and from there, to the trailhead. (38.704917°, -109.615526°)

3.4 Eye of the Whale Arch Trailhead (4,954ft.). (38.715241°, -109.601724°)
And that’s a wrap! I’ll talk about walking up to Leaping Arch from the Eye of the Whale Trailhead in another post!
Round Trip Trail Length: 0.4 miles for Eye of the Whale Arch; 3.4 miles for Whale Canyon
Elevation Gain: 47ft. (4,960ft. to 4,926ft.) (for arch); 607ft. (5,037ft. to 4,738ft.) (for the whole canyon)
Facilities: None
Fees: $30/vehicle, valid 7 days. Remember that some times of year require timed entry. America the Beautiful National Parks & Federal Public Lands Passes and Southeast Utah Parks Passes are accepted in lieu of the entry fee, but do not cover the timed entry fee.

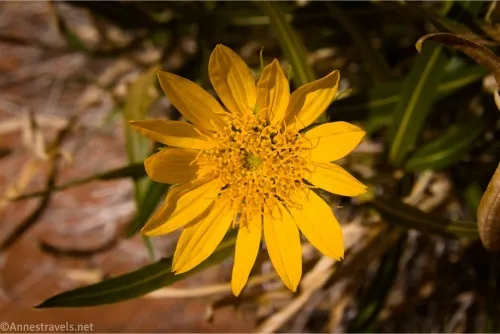
Trail Notes: Whale Canyon really is an adventure. If I’d had more time/it wasn’t so hot in the middle of the day/I hadn’t left one of my companions at the arch waiting for me, I’d have loved to continue down Whale Canyon and turn right in one or both side-canyons that access some of Herdina Park. I hear there are some cool arches and rock formations up there (not that anyone except the American Southwest has provided pictures to prove their claims…) This is a very remote area, so be ready for self-rescue, bring food and lots of water, and try not to hike in the warmer summer months (June-early September) or whenever the weather is warm. Flash floods are possible, so stay out of the canyon if rain is predicted. I saw bobcat tracks near the spring under the overhang – very cool!
Trail 
![]()
![]()
![]()
![]()
Road ![]()
![]()
![]()
![]()
Signs ![]()
![]()
![]()
Scenery ![]()
Would I go 100 miles out of my way for this? ![]()
Overall Rating: 
![]()
![]()
GPS Coordinates for Eye of the Whale Arch
TH: 38.7152500°, -109.6017210° (38°42.91500′, -109°36.10326′ / 38°42’54.9000″, -109°36’06.1956″) (4,956ft.) (0.0)
Eye of the Whale Arch: 38.7131130°, -109.6037471° (38°42.78678′, -109°36.22482′ / 38°42’47.2069″, -109°36’13.4894″) (5,029ft.) (0.23)
Drop into Whale Canyon: 38.7150180°, -109.6051670° (38°42.90108′, -109°36.31002′ / 38°42’54.0648″, -109°36’18.6012″) (5,028ft.) (1.59)
Route around Dryfall: 38.7123060°, -109.6075560° (38°42.73836′, -109°36.45336′ / 38°42’44.3016″, -109°36’27.2016″) (4,830ft.) (1.87)
Dryfall 2: 38.7114560°, -109.6078340° (38°42.68736′, -109°36.47004′ / 38°42’41.2416″, -109°36’28.2024″) (4,812ft.) (1.95)
Cave: 38.7089720°, -109.6105290° (38°42.53832′, -109°36.63174′ / 38°42’32.2992″, -109°36’37.9044″) (4,763ft.) (2.49)
Path up: 38.7044300°, -109.6164020° (38°42.26580′, -109°36.98412′ / 38°42’15.9480″, -109°36’59.0472″) (4,733ft.) (3.12)
Handcrack (coordinates only): 38.7126310°, -109.6041050° (38°42.75786′, -109°36.24630′ / 38°42’45.4716″, -109°36’14.7780″) (4,946ft.)
End (Eye of the Whale TH): 38.7152680°, -109.6017130° (38°42.91608′, -109°36.10278′ / 38°42’54.9648″, -109°36’06.1668″) (4,956ft.) (6.93)
The gpx file for Eye of the Whale Arch and Whale Canyon can be downloaded – please note that this and the GPS Coordinates are for reference only and should not be used as a sole resource when hiking this trail.
Download GPX File size: 66.0 KB Downloaded 106 times
(Note: I do my best to ensure that all downloads, the webpage, etc. are virus-free and accurate; however, I cannot be held responsible for any damage that might result, including but not limited to loss of data, damages to hardware, harm to users, from use of files, information, etc. from this website. Thanks!)
Getting to the Eye of the Whale Arch Trailhead
From the Arches National Park Visitor Center, drive north on the Main Park Road. After 8.8 miles, turn left onto the Willow Springs Road (the turn is on the opposite side of the road from the Balanced Rock). Pass the picnic area and restrooms (the last restrooms you’ll see on this hike). Drive for 0.8 miles from the Main Park Road and, if you have 2WD or aren’t comfortable with serious 4×4, park out of the way of traffic (there is room for maybe two larger vehicles). On your feet or with 4×4, turn right for 1.9 miles to the trailhead, on the left.
For 4x4ers who want the north-south route, you can also take the Main Park Road 16.3 miles from the visitor center to the Salt Valley Road, on the left. Follow this (washboarded but generally a decent road) for 7.2 miles to an unassuming but marked road on the left just before the Tower Arch Traillhead. Turn left here and kick the vehicle into 4 wheel drive (which wasn’t necessary until now). After 1.8 miles, turn left on the West Valley Jeep Road for 7.1 miles to the trailhead (on the right).
More Hikes in Arches National Park
Don’t miss out on hikes in Arches National Park – get a guide that cares what you want to see in the park. Buy your copy here.


The Eye of the Whale Arch looks like a stunning natural wonder. It’s fascinating how nature shapes such unique landmarks, and I’d love to visit and experience the Whale Canyon firsthand.
I hope you can see Whale Canyon someday – it’s a truly amazing place! ~Anne