
ver the last many years, I’ve managed to collect an extremely powerful collection of free and open-source programs. A few of my favorites include GIMP (Photoshop alternative), DaVinci Resolve (for videos), LibreOffice (still learning it, though it’s pretty close to Office), Inkscape (for vector graphics; think Illustrator), and RawTherapee (for manipulating RAW files instead of Lightroom). The last program is the one I want to focus on today. I’ll tell you exactly what settings I use to edit my RAW files to make them look as realistic as possible and mention a few tips and tricks to boot!
Note: I am in no way putting down the paid programs; many if not all have features that leave the free programs in the dust. But I like the freedom of no subscription fees, and in general, the free programs have enough features for me.
Just for fun before I begin, here are two photos: The first is a screenshot of a RAW file that has not yet been manipulated:
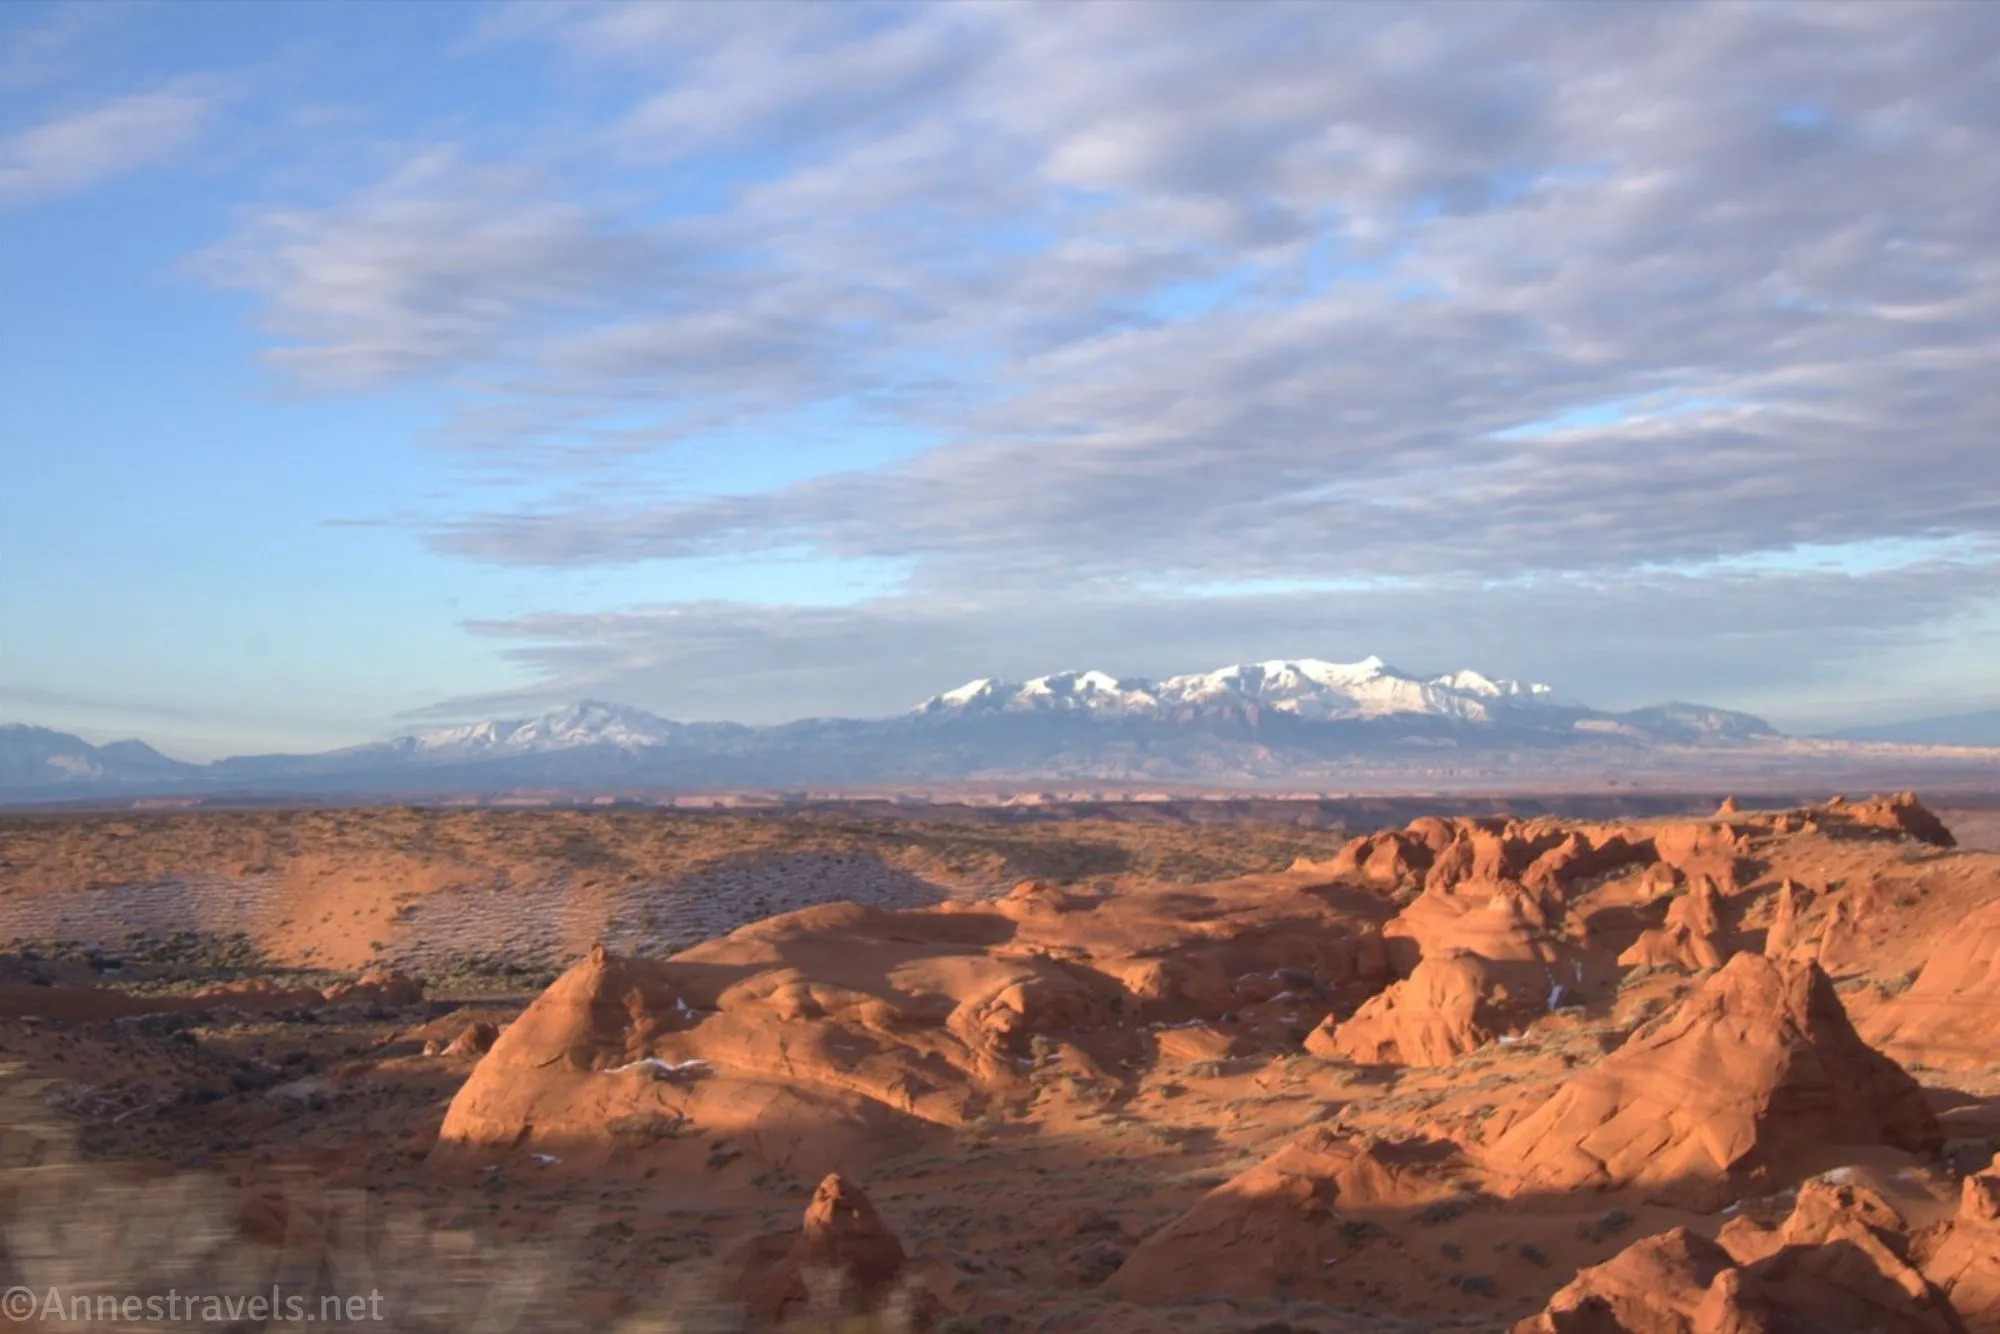
And here’s the photo after I finish editing.
It looks a lot better!
If you’d rather watch me edit a photo, here’s a video. If you like text and photos and screenshots (like me!), read on!
Profiles
I use the “profiles” feature in RawTherapee – I manipulate a certain set of effects (below), save the profile, and then I can load the profile for every picture. This saves me hours of time over thousands of photos, as I can apply my favorite effects at the click of the mouse instead of having to manually manipulate these effects on every picture.
The picture then usually turns out too dark, so I manually manipulate exposure, highlight compression, and other effects as necessary.
I have two favorite profiles at this point:
Profile 1: For photos taken September-February (or whenever the sun isn’t very strong)
Exposure tab:
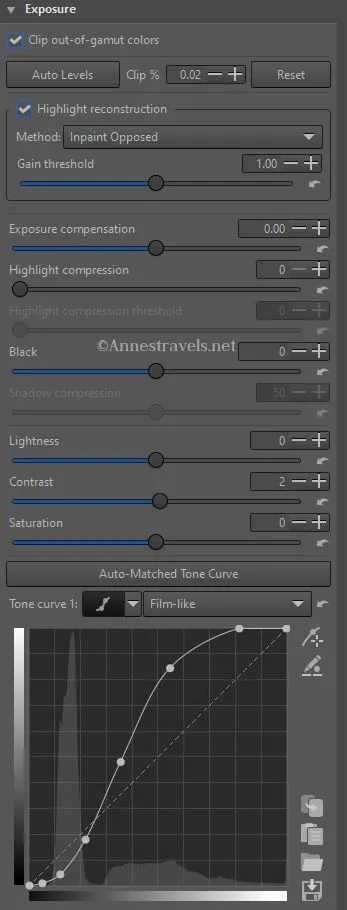
Contrast +2
Vignette Filter tab:
Strength +0.15
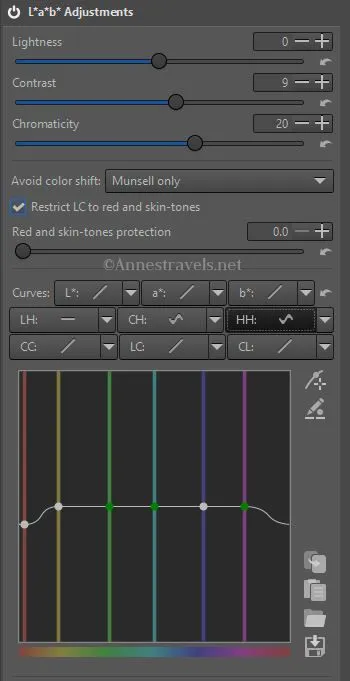
L*a*b* Adjustments tab:
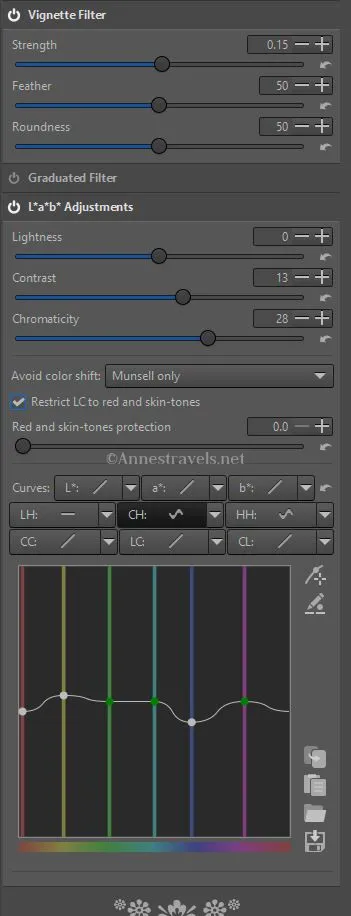
Contrast +13
Chromaticity +28
CH (Chromaticity according to hue C=f(H)) equalizer: I lower the royal blue node and the red node; I raise the yellow node slightly (see photos). Note that to see the equalizer, you’ll need to click on CH:.
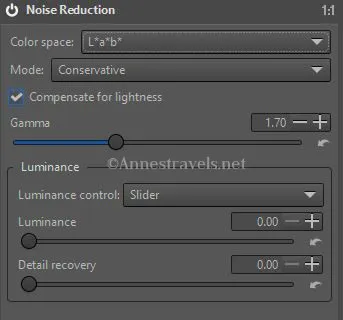
I also set the Noise Reduction (in a different menu) to “Conservative.” (As I recall, this is as easy as engaging the “power” button for Noise Reduction.)
Note that for every tab except exposure, you’ll need to activate the tab by clicking the “power button” in the upper left corner of the tab.
Profile 2: For photos taken March-August (or whenever the sun is bright, strong, and creating massive highlights)
This is identical to the above except for the L*a*B* Adjustments tab:

L*a*b* Adjustments tab:
Contrast +9
Chromaticity +20
The CH is the same as above.
Other Useful Features:
I almost always have to bring up the Exposure, at which point the highlights are blown out. So then I push the Highlight compression slider (under Exposure) to the right. If I need more help, I go down to the Shadows/Highlights tab, activate it via the “power button” and move the Highlight slider to the right a bit. If areas of the photo are too dark, I will occasionally push the Shadows slider slightly to the right.
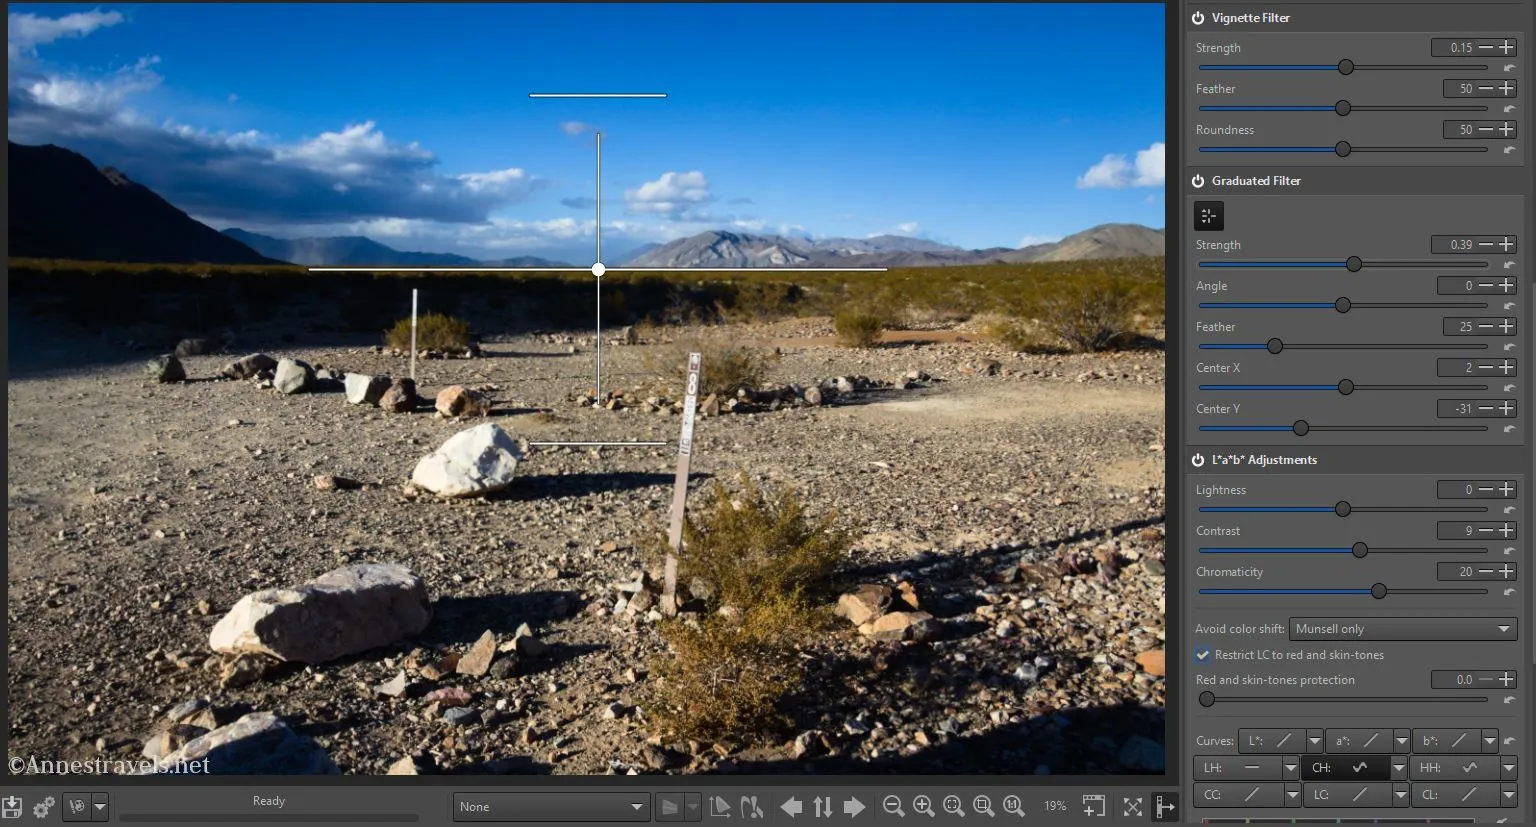
I’ll often use the Graduated Filter tab (below Vignette Filter) if one part of my scene is too light or too dark compared to the rest of the photo (usually the sky vs. the land). The arms of the filter are automatically in the middle of the picture; if you want to move it or rotate it, click the button just below the “power button” for the Graduated Filter tab. A line will appear on the screen which can be used to rotate, move, etc., the filter.
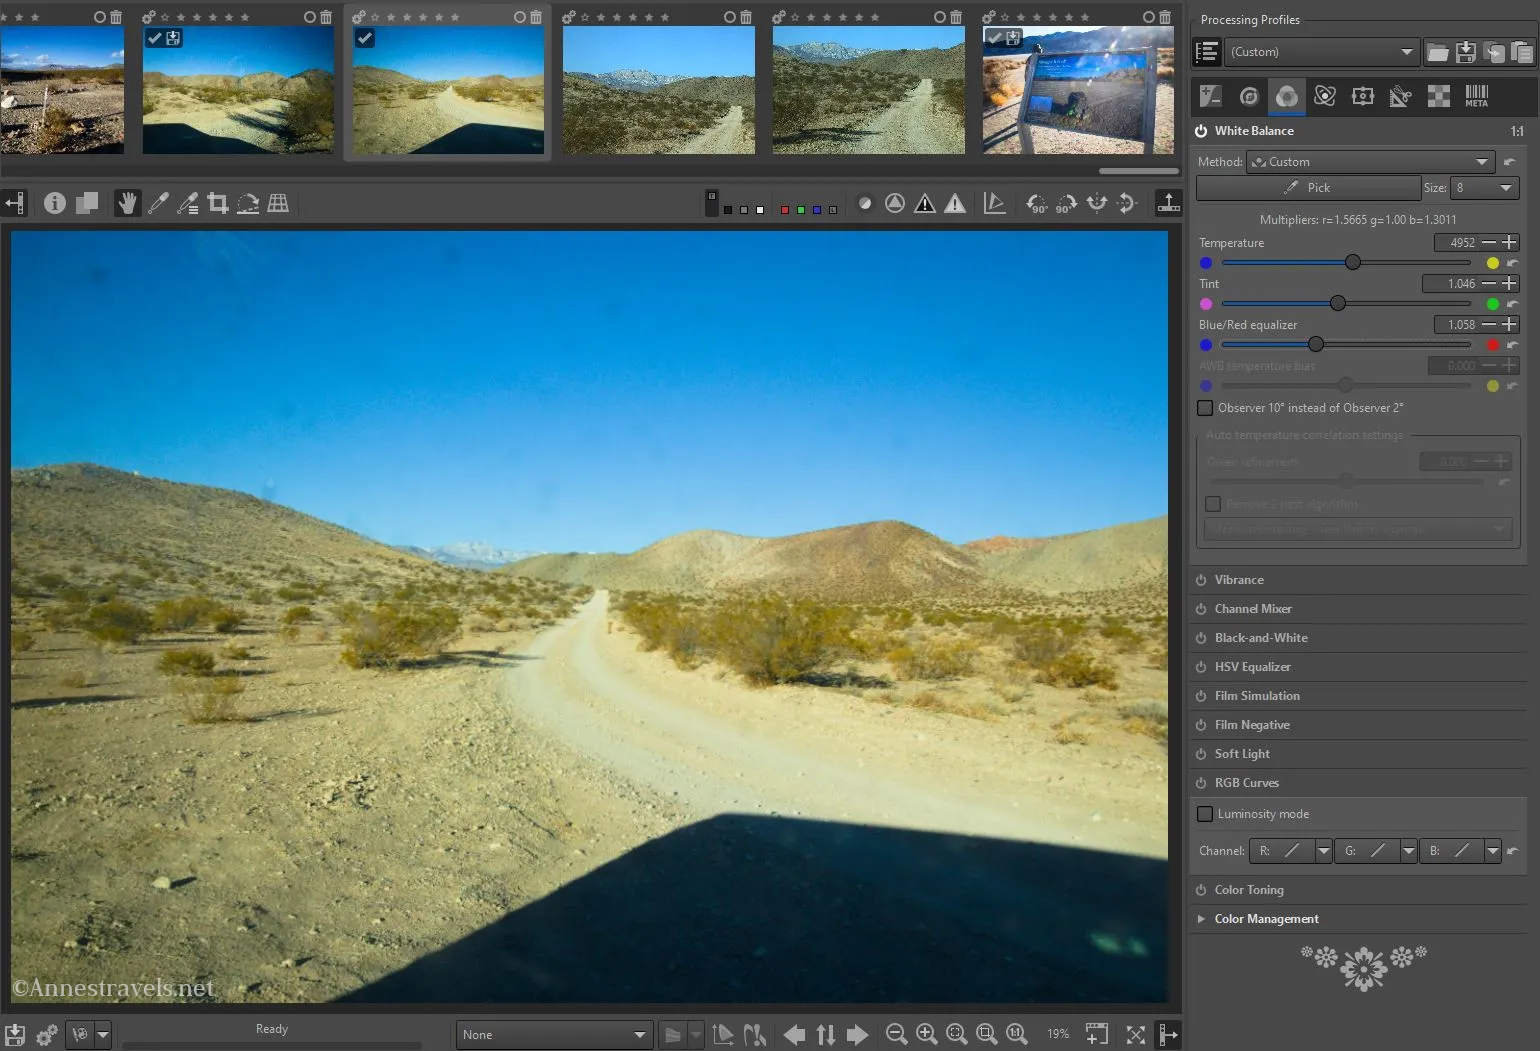
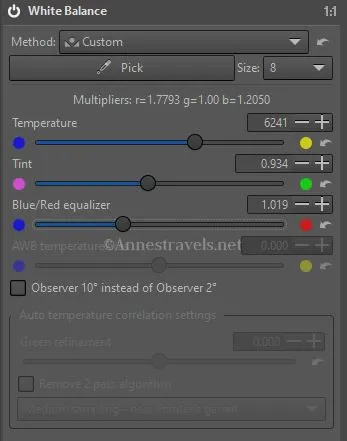
The White Balance tab (it’s in a different menu) is also super helpful. When I take a picture through the van window, it tends to have a blue tint to it. So I’ll push up the Blue/Red equalizer to 0.019 or even as high as 0.058. Every once in a while, I’ll need to make a photo warmer (or very occasionally cooler); the Temperature slider can also be helpful in this regard.
Red Rock Country
I’ve struggled over the years to replicate the beautiful red rocks found in southern Utah. The camera does just fine, but when it comes to the RAW file, the rocks can come out more yellow than red! I’ve yet to find a real solution (that doesn’t turn the entire picture purple), but these two tricks make the pictures (usually) passable:
1. In the White Balance tab, push down (left) the Tint toward magenta (as opposed to the green). You don’t want a purple hue, so don’t go too much below 1.000. You can also push up the Blue/Red equalizer as high as 0.065 (don’t turn your clouds purple or red!)
2. In the L*a*b* Adjustments tab, click HH: (aka the Hue according to the hue H=f(H)). Pull down the red node as far as is helpful.
As I said, neither of these is foolproof, but it’s a lot better than nothing. If anyone has a better way of dealing with red rocks, please let me know!
Do you have editing questions? Feel free to drop them below and I’ll take a stab at them!
More about the Best Digital Pictures
Trying to get more out of your camera or smartphone camera? This book can help with chapters describing how to photograph various scenes and under various conditions. Buy your copy here.
More Related Posts:
 10 Ways to Upgrade Your Landscape Photography with Any Camera!
 How to Take Silky, Dreamy Waterfall Photos (with any Camera!)
 How to Make a Sunstar with any Camera
 How to Sleep 10 People in a Full Size Van
 How to Fix the Internal Battery on a Canon PowerShot SX150 Camera
 DIY Bug Screens for a Ford E150 Van