

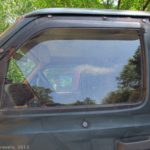
Two of the bug screens on the van
This week, I’d like to deviate a bit from my normal posts about destinations. Instead, I’ll tell you about how you can make custom screens to put over your vehicle windows to keep the bugs out. This is especially important if you’re sleeping inside your vehicle…I can tell you from personal experience that it’s no fun to wake up at 2am with a mosquito buzzing into your ear! The good thing about these bug screens is that they aren’t expensive. I believe I paid less than $20 for all the materials needed to make 7 screens to go over the windows of the van we drive on cross-country treks. And, the screens work. At least, they work if you consider the number of bugs crawling on the outside of the van screens and the number that weren’t in the vehicle with me!
First, the supplies you’ll need:
Screening
(I used petticoat fabric from Joanne’s (it’s stiffer), but tulle would work just as well)
Magnets
(several per screen—I’ll explain later)
Thread to match screening
Second, the equipment/skills you’ll need:
Yardstick or tape measure (a flexible tape measure and ruler is useful, too)
Marking pen or chalk (optional)
Scissors
Needle
Basic sewing skills—it’s not rocket science, since you’ll be hand stitching (no sewing machine required). If you’re not good at sewing, keep reading, because anyone who can thread a needle (even with a needle threader) should be able to do this. Seriously, this could be done with one of those little sewing kits that are given away and have only some thread, a button, and a needle in it.
Step 1: Measuring your windows
The first thing you’ll need to do is to measure your windows and figure out what type of screen you’ll need to make. Regular windows, such as those on a jeep or car, are easy. Simply measure the distance from one side of the window to the other in both directions, as shown below.
For other types of windows, the measurements can get a bit more tricky. For front windows, you’ll need to figure out how to avoid the mirrors. For the front windows of the van, I had the extra complication of quite a bit of plastic. Since I used magnets to hold up the screens, I had to figure out a way to attach the screens around the plastic parts. I’ll show you how I measured around the mirrors, plastic parts, etc., below.

How to measure the front window

How to measure windows on jeeps and cars (click to enlarge)
Because I was making screens for a van, I had another complication: most of the windows flip outwards. I decided to use a large enough piece of screening to go around the flipped out window, but this leaves gaps around the edges of the screening…not good at all! I finally solved this by giving a couple twists to one of the magnets…I’ll show you later. For now, measure the length of screening you’ll need to go from one end of the open window to the other, so that the screen touches the metal of the vehicle (see below).

How to measure a flip-out van window
To cut down on the number of magnets I needed, I opted to make some of the screens larger and then slam them in the barn doors of the van. If you want to do this, you’ll need to measure as shown in the next picture:
Update – after using this system for a couple years, I’d 100% not “cut down on the magnets”; I’d use the first illustrated method for flip windows. The barn door method is a total pain to use, not to mention likely to rip the screening.

How to measure the barn door window
Step 2: Buying the screening
Now you’ll need to figure out how much screening you’ll need. First, figure out the dimensions of each screen. Give yourself an inch more on each side than you’ll need to cover the window—in other words, measure to the edges of where you’re going to put the magnets and then add an inch beyond that on each side of the screen, as shown above. If you’ve got flip-out windows, remember that you’ll need to go all the way underneath the open window. If you’re not sure how all this works, try it out with an old sheet and get your dimensions from that.
Now that you’ve figured out the dimensions of the finished screens, you need to convert this into how much screening to purchase. Most fabric comes in 45” (1.1 m) or 54” (1.4 m) widths. Sometimes you can fit two screens next to each other, cutting down on the amount of screening you’ll need to buy. For example, let’s say I’m getting 54” (1.4 m) netting and I need to make two screens that are 20”x25”. I can place these two next to each other (see “a” below) and therefore only need to buy 20” of netting. However, if I wanted to enlarge these screens and make them 30”x32”, I can’t place them next to each other (b), so I’ll need to get at least 60” of netting (c).

Figure a

Figure b

Figure c
After you’ve figured out how many inches of screening you’ll need, divide this number by 12 to get feet, then divide by 3 to get yards…the fabric store people will appreciate your measurement in yards instead of inches J. (Metric: measure in centimeters, then divide by 100 to get meters). You can ask for quarter yards, half yards, or three-quarter yards, so if you’re right on the edge, get a quarter yard extra. Don’t worry if you have a few scraps left over; you’ll need these later.
Step 3: Magnets
Before you go to the store, you’ll need to figure out how many magnets you need. You will need one for each of the four corners of the window, and at least one on each side of the screen. More will be needed for odd-shaped windows. The diagram below shows how many magnets I used on each of my screens. The point is to make sure the edges are covered enough so that there are no holes where bugs could crawl in—no more than 6-8 inches (15-20 cm) or so between magnets on normal-shaped windows.

How I placed the magnets
Your shopping list should now contain:
1. How many yards of screening you need
2. How many magnets you need
You’ll also need to buy (unless you already have them):
3. Thread that matches your screening
4. Needles
Step 4: Buying the supplies for the bug screens
You can buy your supplies at a local craft/fabric store, or you can purchase the materials online at Amazon.com (I bought them at Joanne’s and Michaels):
If you want to purchase locally, go to your local craft/fabric store and find some screening, netting, tulle, or other very lightweight material that has holes small enough that the bugs can’t get through. You don’t want the holes too small, though, since small holes won’t let air through and can make the inside of the vehicle stuffy. Joanne’s, Michael’s, and Hobby Lobby all have great selections, but they do vary in what they carry. If you can’t find what you want in one store, try another craft store. I could only find small packages of magnets at Joanne’s, but I found a large package at Michael’s that proved to be much less expensive. On the topic of magnets, don’t go for the absolute cheapest ones—these are nearly useless for craft projects, and totally useless for what you want to do, because they don’t have enough power to hold up anything. I used the round, extra strong magnets (ProMAG Flexible Magnets from Michaels—don’t ask me, they aren’t flexible at all). See if you can try them out on metal store shelves before you purchase them, if you can. Also purchase thread to match the screening and needles, if you need them.
This post is getting long, so I’ll tell you about actually making the screens next week. Go to Part 2 here.


Pingback: Screens to keep bugs out of your van, car, jeep, etc.
Pingback: Mount Leidy: Deserted View of the Tetons
Wonderful website. Lots of useful info here. I’m sending it to a few pals ans also sharing in delicious.
Pingback: sleeping in the back (merged thread) - Page 14 - Subaru Forester Owners Forum
Pingback: What To Keep In Bug Out Vehicle | Personal Survival Skills
Pingback: Anne's Travels » Top 10 Pages on Anne’s Travels in 2014
Pingback: The 12 Most Popular Pictures on Anne's Travels
Pingback: The Best of Anne's Travels in 2015 - Anne's Travels