

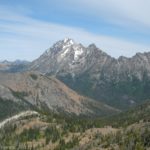
Mt. Stewart, as seen from Earl Peak
The view from Earl Peak has got to be one of the best in the entire Teanaway region of Washington State. Well, Bean Peak, across the valley, rivals this view, but they are quite different senses of “best”: from Bean Peak, you get a close-up view of Mount Stewart as well as several other Cascade peaks, while from Earl Peak you can see well into the Cascade Range, with peak upon peak upon peak spread out below you. It’s awe-inspiring, as well as breathtaking. The only downside was that it was cloudy by the time I got over to the peak, so my pictures didn’t turn out as well as I had hoped. The trail is around 6 miles RT; 7 if you make a loop of it with Bean Peak.
To get to the parking area, from I-90 take exit 85 (South Cle Elum) and head east (north) on Hwy 970. Alternatively, from Hwy 97 south, turn right onto Hwy 970. Either way, you will want to turn north (that’s left if you’re coming from I-90; right if you’re coming from Hwy 97) onto Teanaway Road. Drive approximately 10 miles to the 29 Pines Campground, at which point the road will become gravel. I didn’t see any sign that said “29 Pines Campground”, but there is a campground at this point. Here the road changes names to Forest Road 9737. Continue on this road for just over 3.5 miles to a small dirt road on your right (Forest Road 112). This road is located just before the bridge over Beverly Creek. If you come to the Beverly Creek National Forest Service Campground, you’ve gone too far. Turn right onto Forest Road 112. It is a one-lane, two-way road with bushes growing on either side. It is quite bumpy and isn’t very well maintained, but there were several passenger cars at the trailhead at the end of the road (one was a PT Cruiser). However, I would recommend high clearance. The parking lot itself is quite rocky, so trying to back into or out of a parking space can be interesting.

Earl Peak, as seen from Bean Peak
The trail begins next to the signboard and crosses the bridge across Beverly Creek. At the signboard, be sure to fill out the wilderness permit to enter the Alpine Peaks Wilderness Area (I’m not exactly sure where this Wilderness Area is, so we filled out the form whether or not we were actually entering the Wilderness). Also, pay your $5 a day for a Northwest Forest Service Permit or display your valid pass (see the end of this post) in the windshield of your vehicle—it wouldn’t surprise me if the forest service rangers check this parking area. Then head over the bridge, turn left, and follow the wide trail uphill. My guess is that this was originally the road to the trailhead, but that at some point the bridge collapsed, so the new parking area (and new bridge) was made. This part of the trail has bushes overhanging it, but is quite wide enough that you don’t have to brush up against the bushes. After about 0.5 miles or so you will come to the old parking area. Turn right and keep on the trail. A sign will assure you that you are on the right trail.

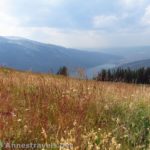
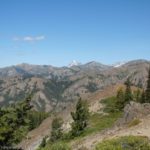
Cascade-style peaks on your left as you walk along the ridge towards Earl Peak
Keep walking for another short distance to a signpost at the confluence of Beverly and Bean Creeks. You will probably not be able to see the confluence from the signpost, but on topo maps you will be able to see this. Go right, heading uphill on the Bean Creek Trail (#1391.1—until now you have been walking on the Beverly Creek Trail, #1391). This is exactly the same as going to Bean Peak, which I wrote about in an earlier post. Hike uphill along the stream for about 0.25 miles. In this section, the trail is somewhat grown in, although it is not hard to follow. Just be aware that you will have grass and undergrowth brushing your legs for a short distance. After 0.25 miles or so, you will come to a stream crossing. This is not a difficult crossing (assuming the water isn’t high) because there are plenty of stepping stones, and helpful hikers have put logs and branches in place for you to step on. Right after the stream crossing is the first steep uphill. However, as soon as the trail enters the pine forest, it levels off a bit. It is still climbing, but no more than Bean Creek, which you will follow for the next 0.75 miles or a little more.

Looking back at Bean Peak while climbing up to Earl
After a while of hiking through the pine forest, you will come out into a meadow. Shortly after entering the meadow, the trail will split, with one trail going right and crossing Bean Creek (quite small by now) and the other continuing straight. Here you have a choice to make: do you want to only climb Earl Peak (6 miles RT) or do you want to climb Bean Peak and then walk along the ridge and up Earl Peak (7 miles RT)? I personally recommend that you do both peaks, because of the beauty you can see from each. The views are very different; as I mentioned in the beginning of this post. I climbed up to Bean and then climbed across the ridge. I will tell about the hike like this; if you want to only climb Earl Peak, cross the stream and then follow the directions backwards to the top of the peak.

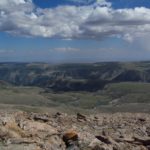
A view from Earl Peak
Climb up to Bean Peak as described in this post. Then head along the ridge to your right when your back is to the valley you just climbed out of. (You will be walking along the ridge so that Mt. Stewart is to your back). There are some very nice views from the ridge, although most of them are behind you. Mt. Rainier may peek out from behind the ridge across the valley, and Mt. Stewart can be seen behind another ridge next to Bean Peak. Across the valley (not the one you came out of—although that is very pretty too) there are many Cascade-type peaks that I don’t know the names of. Take time to look back now and then to look at the view.

Mt. Ingalls “peaks” its head out from behind Bean Peak
You are heading for Earl Peak, the big mountain ahead of you. I think the easiest way to go along the ridge is to stay on top and scramble over all of the rocks and boulders. I tried walking along the scree below the boulders, and found this to be very difficult. Others in my group went along the top of the ridge, and said it was much easier. Just keep walking along the ridge until you come to some pines and the beginning of the hike up Earl Peak. Here you will find a kind of social trail up the side of the mountain. It is still a bit of a scramble, but having the trail there is nice. As you climb up the mountainside, take a look at the view from time to time. It gets better and better the higher you climb. Slowly, the peaks of the Cascades rise above the ridge across the valley. And you get a more birds-eye view of the other peaks you could see from the ridge. All I could say was, “Wow!”

Looking back at Mt. Stewart
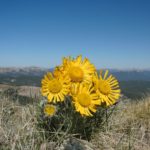
Keep scrambling up to the top of the ridge that is the top of the mountain. This is not actually the top; to get to the highest point (7,036 ft.) you will need to walk almost to where the mountain begins to descend again. Going to the right of the false summits is probably the easiest way. You will have to scramble a bit over boulders and rocks, but it’s not very difficult. The summit itself is the last hump of rock before the trail begins to descend. When I was there, the summit was covered with swarming ants, termites, flies, and mosquitos, so I never actually went onto the summit. However, the view from nearby is absolutely breathtaking, glorious. Take some time to let your jaw drop at the sheer beauty of the view. I’m sorry about the pictures; it was cloudy after we left Bean Peak. Someday, I hope to climb this mountain again in the sunshine.

Cascade Peaks
From Earl Peak, follow the trail down the mountainside. This is no easy feat, although I’d rather go down it than up it! (That’s another reason for climbing up Bean and then going across the ridge to Earl!) The ground is very dusty and slippery, and you are going downhill extremely steeply. Watch your step carefully. More than one of us slipped and fell while trying to get down this slope, although none of us got hurt. At the bottom, take a right into the trees to the trail that will lead back down.
From here, the trail switchbacks its way fairly steeply back down into the valley. I don’t envy anyone trying to hike up this—it’s a fairly steep climb. After about a mile of switchbacks, you will come back to the stream crossing that you saw earlier. Turn left down the trail, and go back to the parking area by the way you hiked up.
Although the trail is steep at times, the entire loop is well worth every ounce of effort you put into it. This was definitely my favorite hike I did in the Teanaway area, and I hope to do it again someday, when the sun is out.
Round Trip Length: 6 miles if you just hike Earl; 7 miles if you do Bean as well
Facilities: Signboard at the trailhead
Fees: $5 Northwest Forest Pass required to park at trailhead. Interagency, Senior, Access, and Northwest Forest Annual Passes also accepted.
Trail 
Road
Signs
Scenery
Would I go 100 miles out of my way for this?
Overall Rating:
This Week’s Featured Product!
Earl Peak and others in the region are featured in this guide. It focuses on hikes with great views all across Washington State.

I love reading your blog. I’ve bookmarked your website in order to check out the latest stuff.
I personally should mention that your entire web site content and articles is quite nice. It’s not simplistic to maintain these types of quality in the blog site. Carry on the good job.
Pingback: Anne's Travels » The Best View of Mt. Stewart